The Plan
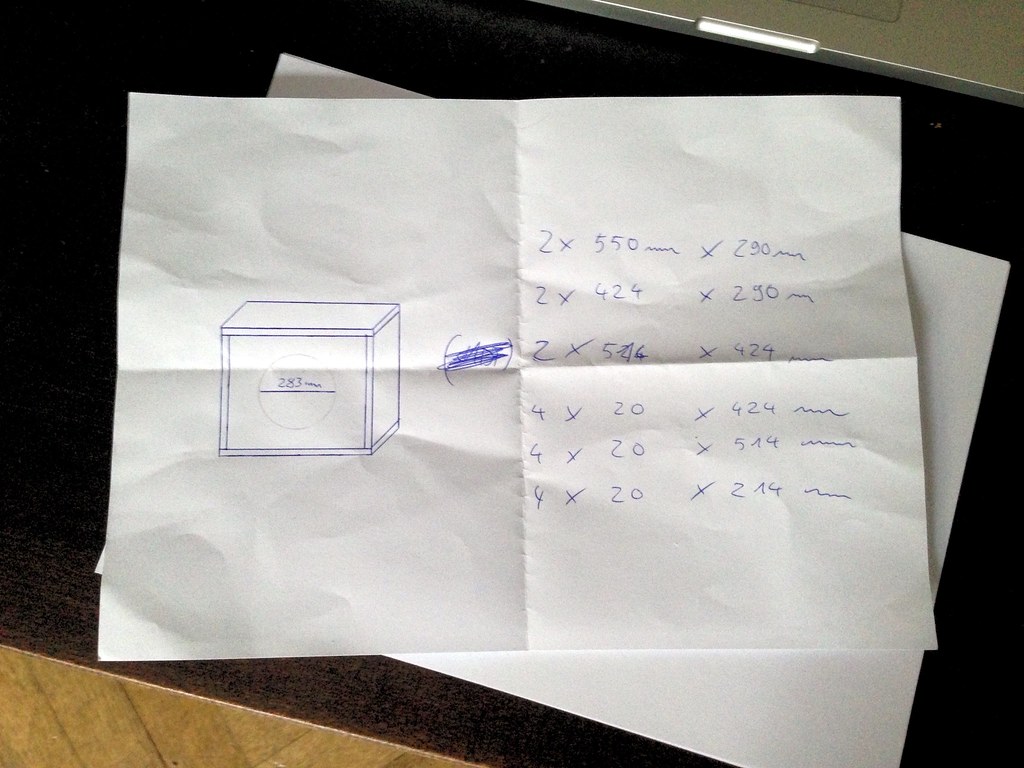
As you might know I’m really into guitars and guitar equipment right now. In my recent holidays I wanted to tinker a little bit and so I decided to build my own 1×12 guitar speaker cabinet. One day I started to scribble a cabinet on a piece of paper that was flying around and half an hour later the plan was laid out. I looked up an existing speaker enclosure to get the proportions right and did not bother to spend much time on speaker cabinet size calculations, which you should do if you plan to build HiFi speakers.
If you search around the web there are certain people who insist you have to do the Thiele/Small calculations to get proper results but I also found an article by one of the most popular speaker vendors claiming that this is only really relevant for HiFi. You can find this article here on the Celestion Website.
There are basically two types of guitar speaker cabinets: closed/sealed and open/vented. Again if you search on the web to know what the differences are you will find tons of information and as usual, sometimes highly contradicting opinions. The biggest difference is how the sound is distributed. An open cabinet will also emit sound through the back and from that alone you get a room filling sound experience even on low volumes. Closed cabinets are more directional and usually put more emphasis on the mid and low frequencies. There is a really exhaustive and informative article on guitarplayer.com about guitar speaker cabinets which includes a very good description of the different sonic properties. For my cabinet I have decided to make the back plate out of three parts so I can have it open or closed and see what works best. When you build a closed cabinet you also have to seal the enclosure airtight as the pressure inside the cab will contribute to the sonic properties.
There is another elaborate article on Seymour Duncans website which I can recommend for further studies.
Materials
Most of the speaker cabs out there are build from multiplexed birch plywood and so I bought 18mm plywood and had the store (Modulor) where I bought it cut for me to the specified sizes. Birch plywood is very inflexible and solid and whatever material you might choose, always make sure that it is not too soft or prone to vibration. Another common and sometimes cheaper material is MDF.

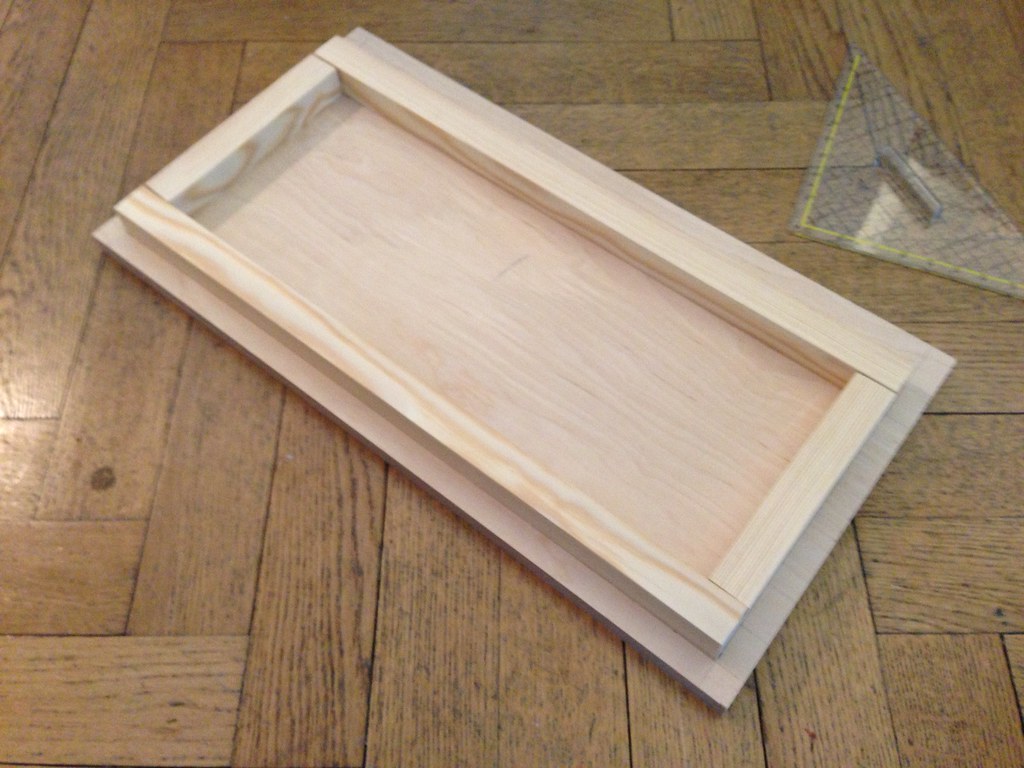
For assembly you have to figure out how to make really stable wood joints. There are simple and complex approaches and I went for a rather simple but stable one which can be seen on the next picture. Its basically adding an inner skeleton and connecting the different pieces of wood with that, rather than just screwing the pieces together directly.
In the next step I had to saw a hole for the speaker and I did it with a simple jigsaw and a special blade for making round cuts. The hole was ok in the end but it did not have to be perfect as I intended to cover the speaker for protection anyway.
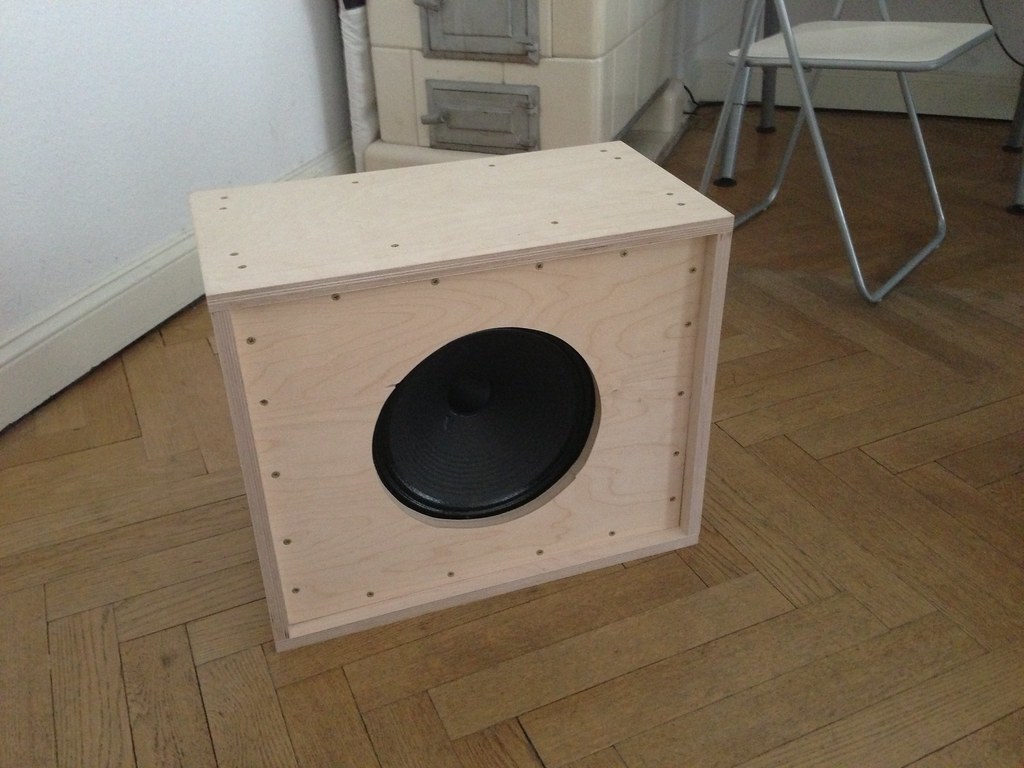
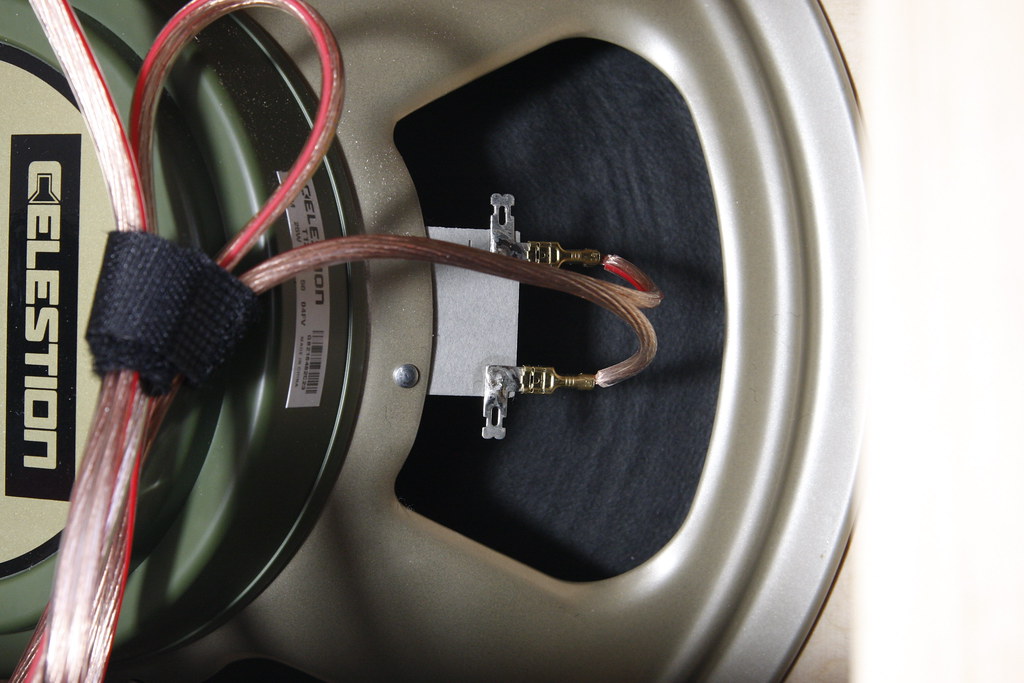
The speaker is a Celestion Greenback G12M with 25 Watts and 8 Ohm. and it is screwed directly onto the plywood. The speaker vendors usually give you a cut hole diameter and you should rather make it a few millimeters smaller than bigger to have enough room for the screws in the wood.
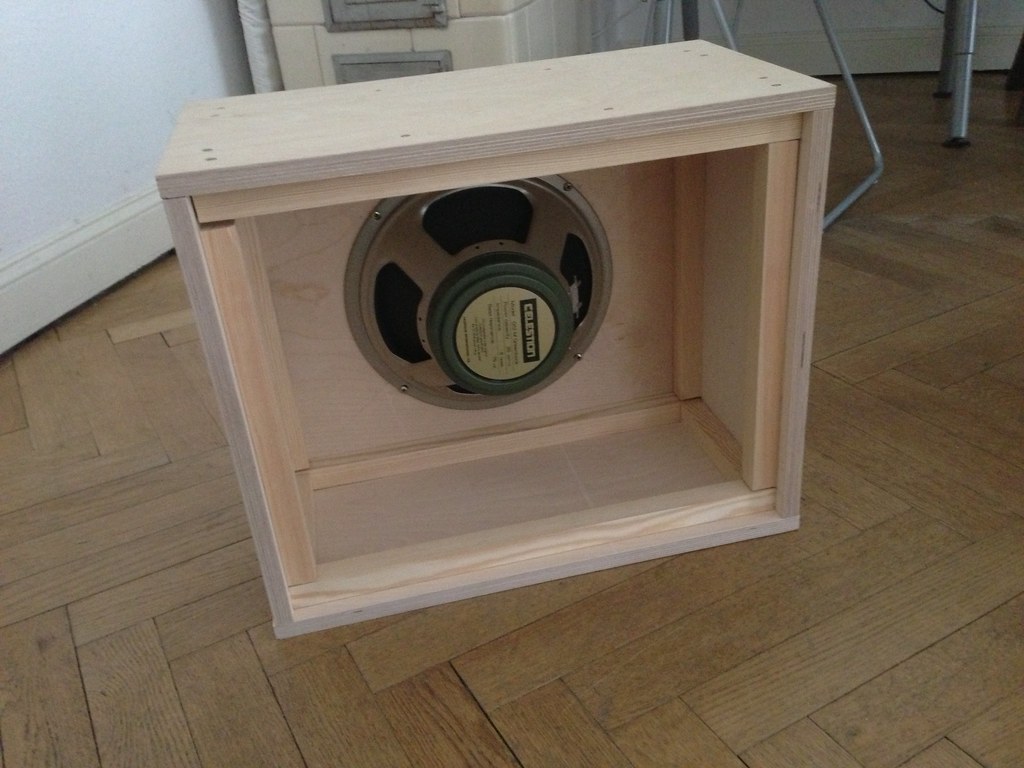
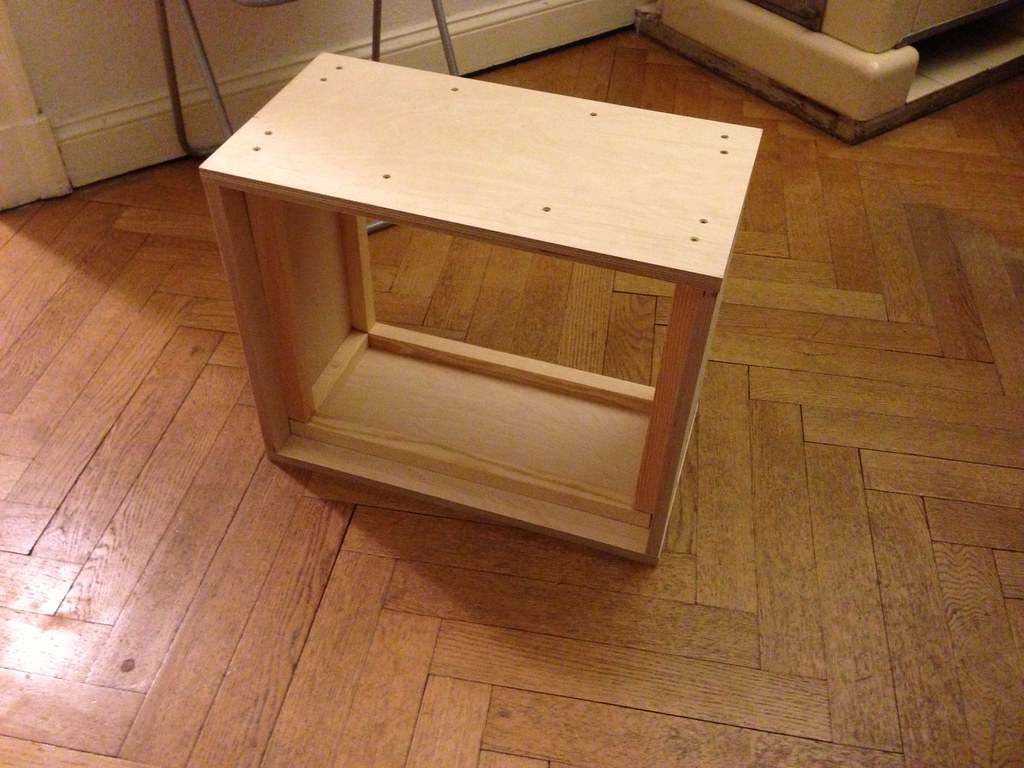
In the last picture you can see that the inner joints do not sit perfectly on top of each other and without the front and back plate the whole thing was not super stable but once I screwed in the front plate and thereby connecting all parts with another, it became so solid it felt like it was made from one piece.
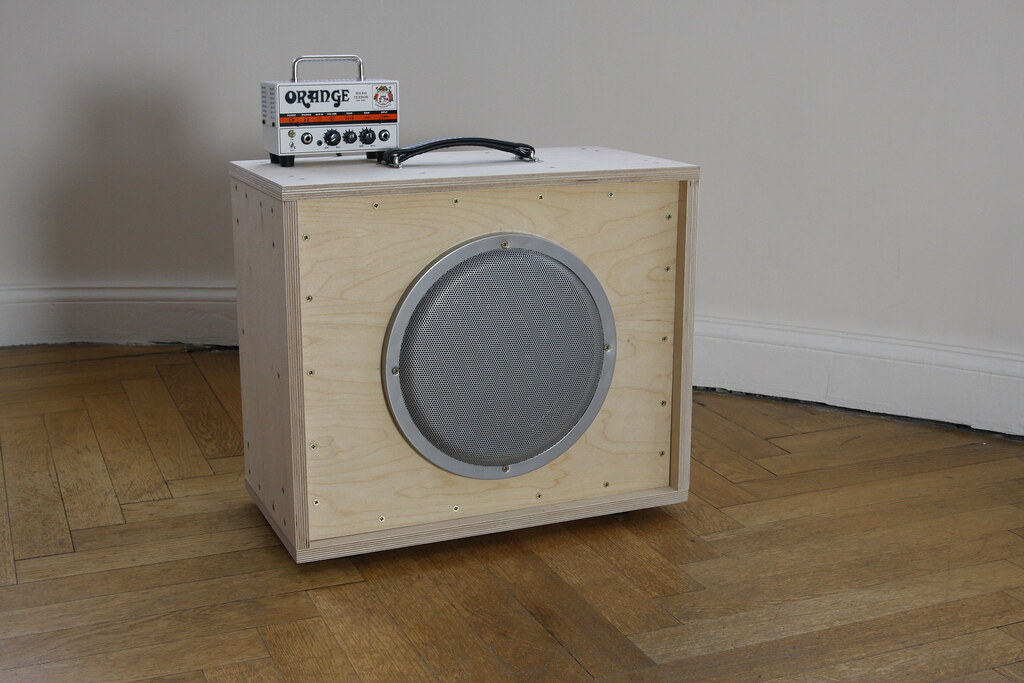
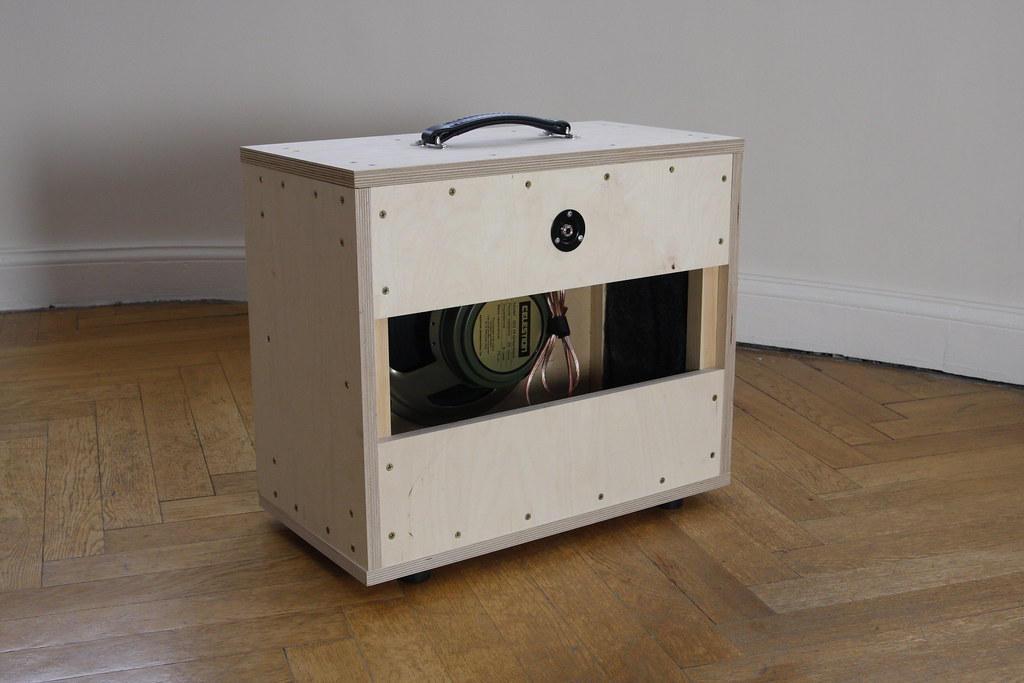
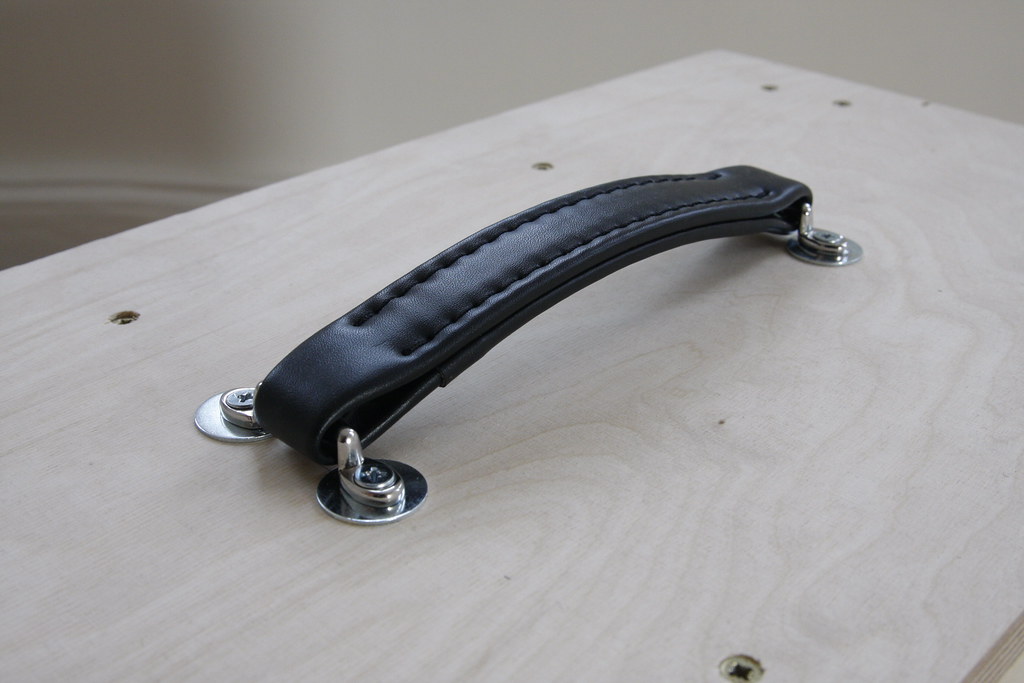
Once I had the cab together some additional hardware was necessary to complete it: A handle, an audio input jack, a cable, insulation wool to reduce echoes inside the cab, a front grill for protection and rubber feet. Luckily there are plenty of web stores that have this kind of amp hardware in stock and so once I got the stuff I finalized the cab.
This is what it looks like in good quality pictures:
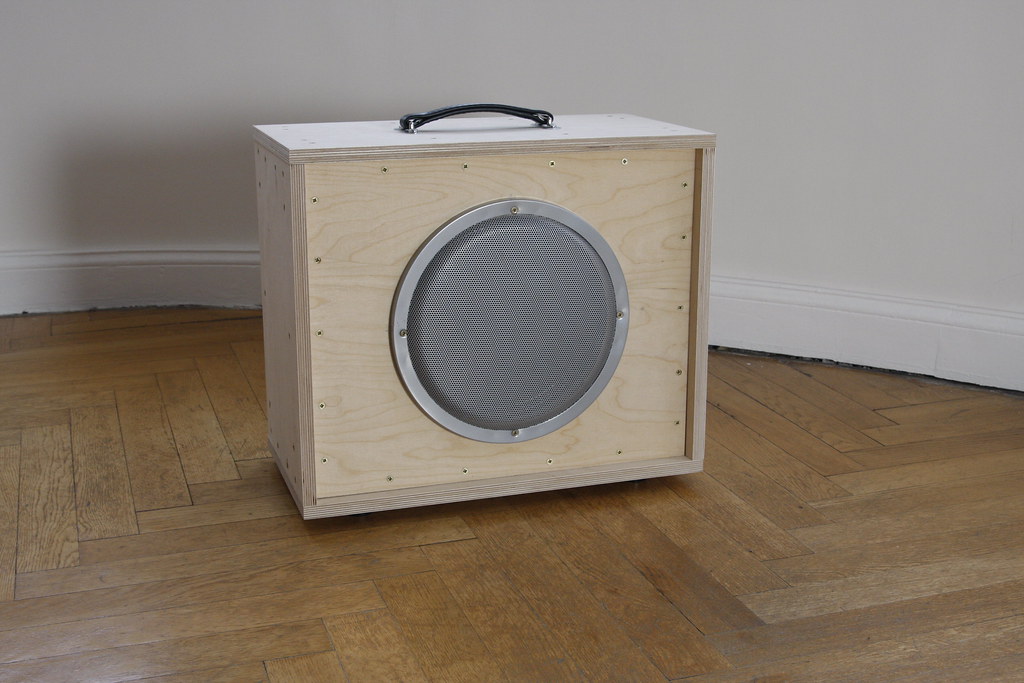

I’m not super exited about the grill and in retrospect I should have probably used regular grill cloth but for now it serves the purpose of protecting the speaker.
Apart from the handle I only used wood screws. I predrilled the outer plywood with a small drill so it would not burst when I screwed in the bigger wood screws. For the handle I drilled holes and used screws with big washers and a self locking nut so it would not become loose again.
After playing around for a little bit I have decided to leave it open. I like the sound much better. The whole thing took about a week with getting all the materials together and the actual construction work. It was a lot of fun and now I have a 12″ speaker cabinet that sounds awesome … and is quite heavy.
To give you an impression of the sound I recorded a basic loop with a Shure SM57 from three different positions. The center of the speaker, the edge of the speaker and the open back of the cabinet. The center is expected to bring out the mid frequencies, the edge includes more low frequencies and less bite in the mid range and the open back is mostly low end frequencies. After the three positions I combined the center and the back track so you can see what kind of options you have with an open cabinet. In the very end I recorded the same loop through my small, closed 8″ Orange cab to give you some point of reference. Notice though that the sound is very different because of the different speaker sizes and closed vs. open cabinet. I used a Telecaster and the Orange Micro Terror in a somewhat clean setting.
[soundcloud url=”http://api.soundcloud.com/tracks/75836795″ params=”” width=” 100%” height=”166″ iframe=”true” /]
There is also a flickr set with all the pictures.
UPDATE
I made a video where I demo the Orange Micro Terror using this cabinet – check it out here
Related
Also check out my blog post on how to build an electric guitar
Hey sweet post, thanks for sharing. The amp looks clean and well crafted. I’m making my second amp cab (my first was way over designed (heavy) and looks fugly (sounds great though)). Posts like yours really help out.
I’m making mine with the natural wood finish for the looks as well as to save time and money on tolex. The only things I can suggest to make yours look really sharp would be to chamfer the corners (w/ router if you or a friend has one) and maybe put some chrome corners on it (gold if you use cherry next time =P ) and to lacquer the wood to bring out the colors/grain of the wood and give it a nice finish.
Also, I like the grill and intend to use one on my amp after seeing yours.
If you REALLY don’t like it, maybe painting the baffle board to match the grill (looks better with black than aluminum I would assume) would make it look sharper.
Anyhoo, thanks again for sharing and I look forward to seeing what your second one looks like =)
Justin
Hey really awesome post here! I was just wondering what the dimensions you used to build the cab were if you don’t mind? I just wanted to try building one for myself and I don’t know where to go to find a plan.
The size is: 550 x 460 x 290 mm. There is a picture of my note for all the parts in the blog post.
I saw that but I cannot make out some of the numbers on the photograph ahah. Thanks though!
yes your writing is terrible
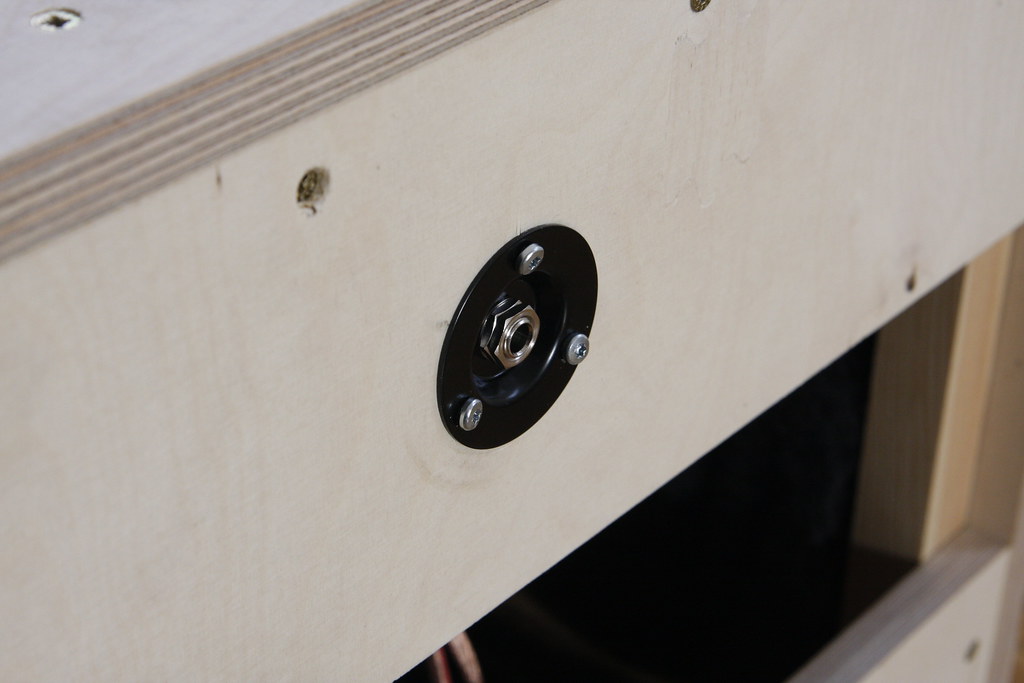
Hi – great post. I’m planning on whipping together a cab from 2 x 10″ speakers I inherited – 60’s era. I was hoping you might be able to share some details on how you connected a (I presume) 1/4″ socket to your speaker? Where your amp plugs into your cab. I’m no electrician and I’m not sure how difficult (or not) that part might be – any tips you could share would be really useful. Thanks again for the post and any help you might be able to provide.
Connecting the audio jack to the speaker is really simple. If you search on the web on how to connect two speakers to an audio jack in a guitar speaker cab you will find a lot of examples/tutorials. Just make sure you get decent speaker cable.
Hi!
I thinking of building my own cabinet, but can’t find any good sites that explains the wiring of speakers and audio jack.
Do you gave any suggestion to a site that explains this in a good way?
Cheers!
Hey, it is actually really easy. Check out this video and link.
Thanks!
Very useful!
Where did you get the hardware, specifically the nice looking grill ?
I bought all the parts in local stores in Berlin / Germany.
One is http://www.banzaimusic.com and the other one is http://sly.de
The grill and handle are from banzaimusic.com. If you google a bit for guitar cabinet and amp parts you will find a lot more (mailorder) stores that are close to your location.
With the proper knowledge of woodworking and with the help of proper materials we can build good quality cabinets. This is the perfect example of quality woodworking. Thanks!
Thanks to hukl for the idea an inspiration, I found this post after getting a micro terror myself.
I ordered similar parts and am halfway through a similar build, have gone with gluing instead of screws on the outside as I wanted to keep a clean look, waiting for the glue to dry is a bit frustrating but I like how it’s turning out so far.
Thanks again.
That looks fantastic!
Great build!
I’m hooked on so called ‘detuned cabs’, first heard about them on Kevin O’Connors site londonpower.com
They’re big but my first one turned out great.
Excellent work. I have been buying drawers from barker cabinet to make amplifier heads. Have used the plywood and also solid maple. Both stained and finished are head turning.
They are true dove tail joints that are cheap and look out standing. Shipped flat so you can finish your self.. All your alignment problems are gone. They are very square. All you need is baffle and back. Handles and feet. Make sure you add note that dovetails will be exposed and they will give you top notch service. Speaker cabinet 2×12 birch ply would run under 100 dollars for the drawer.
Nice work.
Although it is not recommended at all to screw the box. Dowels and glue for less mechanical parts. Also, how did you choose the size of the box? I spent yesterday calculating the 2×12 box using Thiele/Small formulas and got almost the same results as Mesa 2×12 Rectifier which I pretty much fulfilled with. Took me the whole evening and 5xA4 sheets both sides, but totally worth it 🙂
If you’d read the blog post you would know that I didn’t use Thiele Formula and why 🙂
I just copied an Orange 1×12 cab.
On what website do you find the ” audio input jack, a cable” to connect the cabinet to the amp (8ohm) ?
Many thanks, Pierre
any kind of music equipment store – here for example http://www.thomann.de/fr/planet_waves_pws05.htm
Just stumbled upon this DIY gem… Thanks for the post bud – it’s helped me give thought on how to move forward on my own project.
Can you just wire the speakers straight to the input jack?
Yup you can do that 🙂 I did that with another small cab before – but having the connectors in place is definitely better even if the cable ends with the input jack.
How much would you say the project costs to complete?
Wood:
Speaker: (highly variable, I know)
Grill Cloth
Tolex/Paint:
Hardware:
Also, how did you choose your particular design dimensions?
Looks great! Thanks.
If I remember correctly it was under 200€ in the end but not with a lot of headroom left.
I’ve used the Orange 1×12 cabinet for the dimensions event though the Orange is a closed cabinet. If I’d do another open one, I’d check out dimensions of a well rated open cabinet on some music store website. Then again the Celestion tutorial said that if you are building an open cabinet, the dimensions do not really matter so much. If you want to build a closed cabinet, then dimensions matter a lot.
Hello, the inner skeleton looks like a great idea. (way better than gluing 6 sides together in my opinion..) but i wonder something : is there a particular reason why you didn’t screw from the inside ? I don’t want the screws to be visible from the outside of the box.
Thanks for your help
No particular reason for the screws from the outside – apart from laziness maybe 🙂
I love the inner-skeleton idea too. I’ve done a similar project myself, but tired to finger joints myself and some of them are ow coming loose because my cuts were not too precise.
What Material did you use for the inner skeleton? Is that pine?
hi, can we get a clearer pic of the dimensions for cutting as it’s hard to make out in the existing one – thanks so much!
you mean this piece of paper with the hand written sizes? Just to be sure, the pictures are clickable – if thats not big enough then I can also write them down again.
Here is how I made a nice grill btw: http://smyck.net/2014/05/30/proper-grill-cloth-for-my-guitar-cabinet/
is the last one 214? just hard to make out the ones I guess… lolz… nice grill btw, thanks so much!
Ιnteresting! Can you explain how you attached the speaker baffle on the front of the cabinet. What type did you use? Fixed, floating, screwed, glued, both, etc. Also how did you make the hole. Thanks!
I made the hole with a jigsaw and I used screws to attach the speaker to the front panel.
hi hukl
great cabinet! I want to build a 1×12 extension cab to hook up to my Marshall DSL 15C combo amp and create my own little stack.
What would you recommend: an open-back cab, a closed-back cab, or a closed-back cab with a front port?
The amp has a 60W /12″ / 16Ohms Celestion speaker. Which speaker should I select for the cab?
Thanks
I\m a fan of open back but marshall cabs are usually closed so I would probably copy the dimensions, speaker of a marshall cab and make it probably closed. For open back cabs the exact dimensions don’t make such a huge difference. Also it depends if you want to play loud and heavily distorted or more bluesy. For loud and distorted I would probably go for closed cab too.
Thanks a lot! My amp is open-back, so I thought I might try your approach making a back plate out of three parts so I can try it open-back and closed-back.
I have some more questions:
– How do you mount three back plate panels airtight?
– How do you mount the audio input jack airtight?
– Have you ever tried your cab as closed-back version combined with a combo amp to a stack? If so, what were the results?
Thanks a lot
Lorenz
You’re in Berlin? You got plywood cut-to-measure from Modulor?! Dude, you just became my favorite person for the day. You just made my next DIY project way simpler.
I’m glad I could help 🙂 Enjoy! Oh and you can order the cut to measure on the website an pick it up later. Super convenient!
Great and inspiring thread. Thank you. I’m motivated to build my own 2 – 12″ now. And the idea of 3-piece back, probably used open back really appeals to me.
Hey there! Could you tell me where you got the speaker wiring harness? Can’t find one like the one you used.
Thanks!
What do you mean by wiring harness exactly?
Oh right, sorry. I meant the wire that connects the speaker to the external input jack?
Totally awesome! After looking at a bunch of used cabinets in the $250 to $500 range, I got to thinking the same thing, that I can build one myself, and it would probably be fine for my needs. I am thinking about a 2×12, or maybe a 4×10. I have a older Pignose amp that has the ability to drive a 4×12 or so the literature said. It has a single 10″ in the amp, and I’ve always wondered how it would sound at full tilt. Thanks for the write up, I think I am going to go for it.
Hi.
It looks great.I also don’t mind appereance with screws.It looks like more classic speakers..
My question : Inner skeleton wood dimensions.Are they 20*20??
Thanks..
Hmm do you mean the thickness as in width and height or the length?
Thank you so much John-Paul!! It’s already some time that I wanted to make a 112 cabinet to have something small and easy to carry with my marshall head, and I followed *exactly* your dimensions. I assembled it with a Celestion creamback 75 as an open/vented cab and I’m totally happy with the result. I tested 2 grill cloth I wasn’t really happy with then found some fancy synthetic furr I liked, which I also used to customize my marshall head, here’s how it looks: http://lurr.co/cabinet112/
Very cool! It is very nice to see when people get some inspiration from those kinds of posts 🙂
Excellent site my good man! I’m inspired now to make my own cab as well. Only question I have is, if you were doing it again with what you know now, would you do anything different?
Hmm I would probably paint the wood with some translucent lacquer or oil, round the edges better and would try to cut a more precise hole for the speaker. The jigsaw was not very good and made a somewhat round hole. Apart from that its still one of my best cabinets 🙂
Several years ago this article inspired me to build this 2 x 12″ cabinet, which has served me well ever since! Thanks!
https://drive.google.com/open?id=1NTTiNcE5_-iCTE-2XSExYeZkHhX_RoWh
awesome!
Finished mine very nice with rounded edges fitted with Lorantz speaker and cloth grill looks like its pro made very pleased too bad i cant post pics. Thanks for the specs and inspiration.
Maybe you can upload some pictures some place and post the URL?
“Gitar Fogie”
I enjoyed the post. I got some good info for my projects. I like to do builds based on what I have or find. Currently I am working on a cabinet for a pair of PolkAudio MC60 ceiling speakers that I got from a thrift store for a song. Thinking of going open back. I hope it will be a good match for my Traynor quarter horse (25 watt) stomp box amp.
Hi, great project and thank you for the instructions!
I was wondering if you cut some of the “skeleton” pieces afterwards – specifically the 214 mm ones, because with the given dimensions they wouldn’t fit if we want “recessed” front plate, like you made it.
So happy that I found your post. I’m looking into buying an Orange Micro head. If I do, I will likely build my own cab. Thanks for the concise narrative and great pictures — a great help!
I am thinking of building a bass cabinet with all the chipboard I have been left,I have two Eminence 15inch 300watt speakers so would a cabinet 18inchx18inch x( 12inch) in depth be ok.
Many Thanks
DAVID