Recently I was getting back into photography and as a result I was looking for a place to host my photos and share them with my friends without making them public to the whole world. Additionally I would like to see the photo’s EXIF information and other metadata.
I do have an old flickr account and so I’ve tried that first but I was quite disappointed by the antiquated interface of adding and editing photos, including its permission settings for viewing.
Next I was looking for self-hosted photo gallery options, ideally with few external dependencies and written in a programming language like Go or Elixir.
I’ve checked a few of them out and decided to give Photoprism and Photoview a shot since they’re both written in Go.
Photoprism, despite having a 3rd party portfile for FreeBSD was impossible for me to install as the portfile does not appear to be well maintained and failed at a critical build stage with no apparent workarounds.
Photoview had to be installed manually on FreeBSD and the installation process also had some things I needed to figure out to get it running. There is a manual installation page in the documentation but not all steps lined up.
This is why I’ve decided to compile all the required steps to install Photoview on FreeBSD for the next person attemting to give it a go – so here we go.
Next I had to figure out the correct pkgs as some did not correspond 1:1 with their linux versions:
libheif
libde265
go
pkgconfig
dlib-cpp
lapack
blas
cblas
node16 (higher version would probably work as well)
npm-node16
To build the UI part of photoview I had to run:
cd ui
npm install
Then before building the frontend I had to edit the vite.config.js file and add the folloing lines to the top level of the defineConfig section.
build: {
chunkSizeWarningLimit: 1600,
}
Mine now looks like this:
import { defineConfig } from 'vite'
import svgr from 'vite-plugin-svgr'
import react from '@vitejs/plugin-react'

export default defineConfig({
  plugins: [react(), svgr()],
  build: {
    chunkSizeWarningLimit: 1600,
  },
…
After that the frontend part of photoview should build by running:
npm run build
When this was successful, change to the api directory.
The official documentation says that a simple
go build -v -o photoview .
should be sufficient but on FreeBSD it fails to find some of the dependencies which lead me to this Github issue which had the solution in the comments.
Runing this command did the trick for me:
env CGO_CFLAGS="-I/usr/local/include/" CGO_CXXFLAGS="-I/usr/local/include" CGO_LDFLAGS="-L/usr/local/lib" go build -v -o photoview .
Lastly the documentation tells you to copy the build results to a new location. Instead of building into a folder called “build”, on my machine the frontend was built into a directory called “dist”.
Therefore these are the commands I’ve used to put everything together:
I’ve edited the .env file and put in my database connection details and set those to options:
PHOTOVIEW_SERVE_UI=1
PHOTOVIEW_DEVELOPMENT_MODE=0
Then I made a folder for the photos to go. To upload new photos, create a subfolder and put your photos inside. A new album will be automatically created for that subfolder.
This is now in a local only jail, meaning that it has no LAN or WAN address and instead uses a 127.0.1.x IP. On my web jail I configured a new vhost in nginx to proxy requests to the photoview jail.
Right now I have not made an RC script for it but when I do I will amend this post accordingly.
That’s it for now – I hope it helps another FreeBSD sould along the way. Right now Photoview does pretty much what I wanted. It’s quite simple but not too simple. If I had failed installing and running it, I would’ve went with Lychee otherwise.
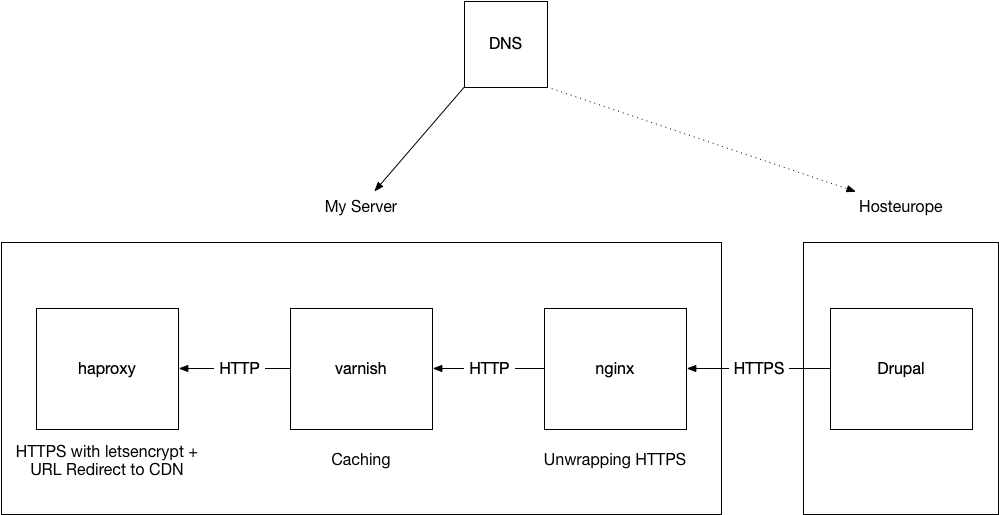
In this blog post I will describe how you can dramatically improve the performance of your PHP CMS website that you’ve hosted at a webspace provider, in this case Hosteurope. To achieve this I’m using nginx, haproxy, varnish, s3 and CloudfrontCDN.
A friend of mine is selling her designer brides dresses on her website and occasionally her business is featured on TV fashion shows. When that happened in the past, her website broke down and was basically unreachable. She called me because she was expecting to be featured on another TV show soon and this time she would like her website to be up and running, especially her web shop. Of course, there was only a few days before the broadcast, so the solution had to work fast.
From the outside it wasn’t clear why the website was unreachable when the traffic was surging in. Was the PHP of the CMS too inefficient and slow? Was the web server of the webspace provider too slow? Was the uplink saturated from all the large images and videos on her website? Because there is no way to figure that out quickly and all of those options are possible I tried to come up with a plan:
Check if there is caching in place and if not add it to make the dynamic PHP site static, except for the online shop
See if we can somehow dynamically add a CDN (Content Delivery Network) in the mix to serve all the large assets from other and more capable locations
It turned out that the CMS (I believe Drupal) had some sort of caching enabled but because cookies were enabled all the way and many elements in the HTML had dynamic queries in their URL, I wasn’t convinced that the caching actually had any effect.
I wanted to add a caching reverse proxy in front of the website to have full control but of course that isn’t easy on a webspace provider. So I thought, maybe I could use my own server, set up varnish there and have the Hosteurope website work as its origin server. But there was another problem. The website was using HTTPS and it was not easy to disable it or download the certificates. In order to get the caching on my server to work I had to do this:
Somehow unwrap the HTTPS/SSL
Feed the decrypted HTTP to varnish
Strip cookies and query parameters for the static parts of the website which do not change frequently
Re-wrap everything in HTTPS with a letsencrypt certificate
vcl 4.0;

# this is nginx
backend default {
    .host = "127.0.0.1";
    .port = "8090";
}

# Remove cookies except for shop and admin interface
sub vcl_recv {
    if (req.url ~ "(cart|user|system)") {
        return (pass);
    } else {
        unset req.http.Cookie;
    }
}

# Add caching header to see if it's working
sub vcl_deliver {
    # Display hit/miss info
    if (obj.hits > 0) {
        set resp.http.X-Cache = "HIT";
    }
    else {
        set resp.http.X-Cache = "MISS";
    }
}
After setting this up, it was time to test if that actually made things better. For these kind of quick tests, I’d like to use a tool called wrk. I modified my /etc/hosts file to point the domain to my server locally and temporarily and then fired away. This alone provided a 3x increase of requests per second, however if you start small, 3x is not that amazing. It went from ~ 18 requests per second to about 60 requests per second.
It is worth pointing out that the cross datacenter latency between my server and Hosteurope can be neglected in this scenario. Since varnish is caching most of the requests, the origin server is barely ever contacted once the cache is filled. Very quickly the statistics of of varnish showed nothing but cache hits, all served directly from RAM.
These kind of tests are always limited though. My server was still relaxed. The CPU was bored, my 1Gbit uplink not saturated and the disk with a ZFS mirror and 16GB of read cache was also not preventing more throughput. It was of course my own machine and home internet connection.
To properly simulate TV broadcast conditions, you need a distributed load test and because I didn’t have the time to set that up, I moved on to the next problem which was getting the large assets delivered from a CDN. I know from experience what my server and haproxy, varnish and nginx are capable of and I was confident, they would not buckle.
Getting the assets on a CDN wasn’t easy either as it would have meant to manually go through all pages of the website in the CMS and change each and every single one of them.
Luckily most of the asset URLs followed a consistent path structure which meant I could download the folders containing the images and videos, upload them to s3 and put the AWS Cloudfront CDN in front of it.
When a user is browsing to the website which is now essentially hosted on my server, all the referenced assets will also point to it. This means that I can rewrite and redirect the asset URLs to point to the CDN instead. The overhead of the 303 redirects would be ok.
The benefit of this is also increased introspection as varnish and haproxy each have their own elaborate statistics reporting. Spotting errors and problems becomes very easy as well as confirming that everything works.
The last piece of the puzzle was to configure AWS CloudFront properly as I have never done this before. It is worth mentioning though, that if you’re not sure if you want this permanently, CloudFront is the most unbureaucratic way of setting up a CDN. Most other will bug you with sales droids requesting lengthy calls for potential upsales and signing long term contracts. With AWS you can just log in with your amazon account, set things up and use them as long as you need them. No strings attached.
As a last preparation step I reduced the TTL of the DNS records to the lowest setting which was 5 minutes at Hosteurope so that in case, something goes wrong, I can switch back and forth rather quickly.
Then it was time for the broadcast and this time the traffic surge was handled with ease. Instead of breaking down and being unreachable, ~15k users and ~700k requests within 1-2 hours were served. Clouldfront served about ~48GB of assets while my server delivered ~2GB cached HTML and some JS and CSS which was too cumbersome to extract to the CDN.
This is of course a temporary setup but it worked and solved the problem with about half a day of work. All humming and buzzing in a FreeBSD Jail without any docker voodoo involved. Made me feel a little bit like the internet version of Mr. Wolf.
What we learned from all the statistics of this experiment is that it is most likely that Hosteurope does not provide enough bandwidth for the webspace to host all those large assets and that it would be wise to move them to a CDN either way which then would require the manual labour of changing all the links in the CMS.
Until the transition is made, I’ll keep my setup on stand-by. Either way I hope this is helpful for other people searching for solutions for similar problems.
Lastly I want to address the common question of why I’m not just using nginx for everything that haproxy and varnish are doing?
The answer is that while nginx can indeed do everything, it isn’t great at caching, ssl termination and load balancing. Both, haproxy as well as varnish are highly specialised and optimised tools that provide fine grained control, high performance and as mentioned above, in-depth statistics and debug information which nginx is not providing at all.
To me it’s like having a Multitool instead of having dedicated tools for specific jobs. Sure you can cut, screw and pinch with a multitool, but doing those things with dedicated tools will be more satisfying and provide you with more control and potentially better results.
Podcasts are still quite popular and new ones appear everyday. It is a fantastic format and I encourage everyone to give it a try.
This of course involves the process of recording audio and if you haven’t done that before, there are a few things to keep in mind to get the best possible result, no matter what your budget is.
In this blog post I want to talk about the most important things for achieving a great sounding recording for your podcast. The principles discussed are not limited to podcasts though and apply to other audio recording situations as well.
There are some sections which go into an extra bit of technical detail. If it is too much for you, feel free to glance over them and come back later if you care to learn more.
The Source
It doesn’t matter what you record, whether it is speech or music or ambient sounds, most problems can and should be fixed at the source. Here you have the biggest leverage on how good your recording will sound like and how much post-processing will be needed.
The Room You Record In
Rooms do have a sound on their own. You’ve been in big halls with a lot of reverberation, or in tiny little rooms which sounded dampened and lifeless. Ideally you want a room that does not have a lot of reverb, just enough so it doesn’t sound completely dead.
When you think about where to record, a bad choice would be a kitchen, a bathroom or big, empty rooms with hard surfaces like tiled floors because they tend to have a lot of reverb and undesirable echos.
You can easily test your room by standing in the middle of your desired recording room clapping your hands or snapping your fingers. Listen carefully after each loud clap how much reverb / echo of your clap you can hear. How long is the high frequency trail of that clap echo? Then try different rooms and choose the room with the least echo and reverb.
Of course you can also go ahead and reduce the room reverb by putting up acoustic panels on the wall. The typical square foam panels will help with reducing the reverb. Also consider putting a carpet into the room if it has not one already. Lastly you can try to put improvised dampening around you while recording. I sometimes put up mic stands in a T shape, put blankets over it and surround myself with those with a bit of distance. Acoustic treatment for rooms is a hole different problem domain though but there are great beginner guides for the basics out there.
Room Noise
Another thing to be mindful of is the noise that surrounds you. Be it the street next to your house and its traffic noise, an AC or fan, squeaking chairs or floors or the washing machine next door. All of this could be picked up by a microphone and will degrade your signal. If you want to get rid of this noise when editing you’d use something like a gate to mute the signal when nobody is speaking and open it once someone is speaking. But when you have a lot of background noise, this noise is muted and unmuted as well and it creates a messy listening experience.
So when choosing a room, keep the noise in mind and if you can, pick the quietest room with the least amount of reverb. It will always be a compromise unless you’re in a sound studio so experiment and try what works best in your situation.
The Microphone
The microphone is quite essential in the recording process of course, but even the greatest microphone will not yield great results in a bad sounding room. That is why the microphone is addressed after the room.
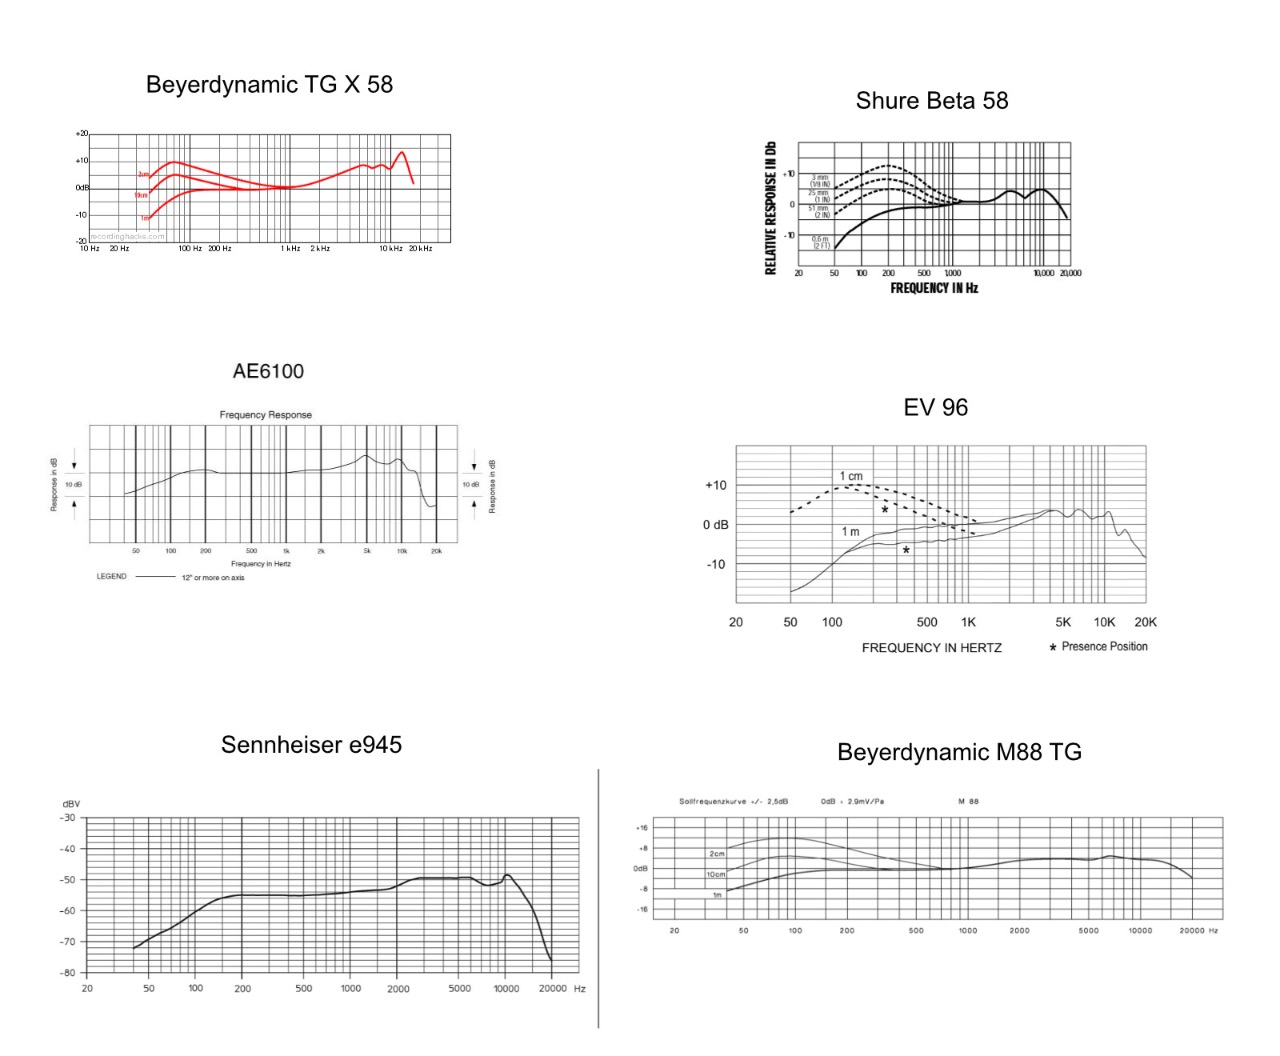
There are a few different types of microphone and almost all of them are suitable for recording voices for a podcast. The most commonly used mics for vocals are dynamic and condenser mics. Both of these come in variants with small or large membranes or diaphragms. Both types are available either as headset or as standalone microphone.
Condenser Microphones
Large diaphragm condenser mics are very common for recording vocals in a music studio. They capture the full frequency spectrum of the voice without too much coloration. But because they are supposed to pick up all the nuances, they will also pick up any noise in your room as well as the reverb.
In a situation where your room is not ideal, I’d recommend using a headset with a small condenser mic which will be closer to your mouth and more directional which means it won’t pick up as much of the room ambience and noise. A pro-level headset example would be the beyerdynamic DT-297 but there are cheaper alternatives.
Headsets also have the advantage that you don’t have to sit still in front of a mic stand. A mic stand plus a big condensor or dynamic mic also block the vision to some degree. If all the participants sit in the same room for recording, a headset allows you to move your head freely and doesn’t obscure your eye contact with the other participants. You can sit however relaxed you want. Something you can’t do with a mic on a stand.
No matter if you’re using a large diaphragm condenser mic or a small one in a headset, both types will need phantom power. Usually every pre-amp you can plug your mic into should have a switch to enable phantom power – even standalone recorders like the ones from Zoom or Tascam.
A benefit of this is that condenser mics usually have a higher output level than dynamic mics which means you can get away with getting a cheaper audio interface or mixer – but more on that later.
Dynamic Microphones
Dynamic microphones are widely used in live situations and on loud instrument sources. On almost every stage on this planet, vocal performers will use a dynamic mic and their instruments, especially drums and guitar amps, will be miced up with dynamic microphones as well. The reason for this is that they are constructed in a much simpler way. Basically they work just like a speaker in reverse.
Their simpler construction makes them more forgiving when it comes to physical stress – as in dropping the mic, humidity or extreme sound pressure levels. They also don’t require phantom power which adds to their versatility.
The slight drawback of dynamic mics is that they usually have a more pronounced sonic character than the condenser mics. Dynamic mics for live situations for example, will almost always boost the mids and high mids to give vocalists more presence in a live mix. In a studio, especially with singers who have a high and/or thin voice, such a mic will not work well.
(This is an overview of the frequency response of common dynamic mics for live situations. All of them will boost the mids starting from 2kHz)
A great dynamic mic for vocals is the Shure SM 7B as its frequency response is fairly even which makes it sound very round and full. Its one of the most popular dynamic vocal mics in studios. Its major drawback is that its output level is quite low which requires a beefy pre-amp to operate it properly.
Summary
For podcasting the simplest, most convenient and adequate option would be a headset with a condenser mic. Phantom power is available in a wide variety of recording systems, it’s comfortable, the mic position is consistent throughout a recording and it does not require a powerful pre-amp.
You also don’t need mic stands and you are free to move around to some extent during the recording.
Because I don’t own headsets but quite a collection of studio mics, I often record podcasts with large diaphragm condensers or the Shure SM 7b. I prefer it sonically but it comes with all the drawbacks of practicality and convenience.
Another alternative are lapel mics, which are even more convenient to wear but the ones that sound decent cost a lot of money and are a hassle to connect to a pre-amp.
The Audio Interface
Now that we talked about the room, noise and the microphones it is time to talk about the device which will capture the audio and convert it to digital.
If you are recording a podcast with multiple participants, make sure that your recording device has sufficient inputs so that you can record each participant to a separate track.
The Pre-Amp
No matter what recording device you choose, it will all have a pre-amp unless you are using a USB mic, which will have the pre-amp built in.
Because the output levels of most microphones are quite low, they need to be amplified to line level so that they can be played back through regular hifi/monitor systems (which further amplify the line level signal to speaker level).
If the output of a microphone is quite high (some get close to line level), less amplification is needed.
If the output of a microphone is low (as the Shure SM 7B), more amplification is needed.
The noteworthy thing about this simple equation is that existing noise in the signal or in the circuitry of the interface or the microphone will be amplified as well.
This becomes even more relevant if you bought a very affordable interface with a weak pre-amp and pair it with a very low output microphone. As you dial up the gain on the pre-amp, more and more background noise will become audible in the resulting signal. On a cheap interface I have to dial up the gain to maximum to have a usable level from my SM 7b and the noise as well as pre-amp distortion are very present at this point.
This applies basically to all pre-amps like in portable recorders, audio interfaces, dedicated pre-amps, mixers and mixing consoles. Usually the most affordable product line of any of those categories of any of the vendors will have weaker pre-amps than the next higher level product line of the same vendor.
I’d recommend getting something with pre-amps that have at least 50 dB on tap – ideally 60+ dB. With that amount of gain available, you should never need to turn it up more than 2/3, even on quieter sources or with low output microphones. In my experience, most pre-amps stay reasonable quiet up to this point.
A lot of cheap pre-amps will only go up to 35 dB and for an SM 7b recording normal conversations, this is not enough. You’d have to crank up the gain knob and as a result will get noise and distortion. An interface with twice the gain will leave you a lot of headroom before the pre-amplifier starts to distort and before its own electrical / thermal noise becomes audible.
However, if you are going for phantom powered condenser headsets, you can get away with weaker / more affordable pre-amps.
Focusrite and Zoom are two brands with quite affordable recording products which work great. Focusrite’s most affordable interfaces have quite useful and impressive pre-amps with lots of headroom and very little noise. The Zoom recorders, especially their L-12 podcasting machine is offering a lot of flexibility for your recording needs. Most notably for podcasts, it has 5 dedicated headphone jacks which you can mix individually. When you record with headsets this saves you an extra headphone amp (which would amplify the line level to headphone level).
In general though, just check the reviews and specs, compare them and look up things you don’t understand. Check that the manufacturer keeps the drivers up to date for your platform and that a broad group of people is generally happy with the product in customer reviews. Read especially the one and two star rating reviews if there are any.
Nothing Else?
Of course there are more aspects of a audio interface that impact the quality of the recording but they are less relevant if you have optimized everything discussed up to this point.
Especially for recording conversations, the quality of the Analog-To-Digital and Digital-To-Analog conversion for example are neglectable.
In professional studios, usually more hardware components come after the pre-amp in the signal chain before the signal is sent to an audio interface to convert it to digital. These are usually effect processors which either control the dynamics (change of loudness) in a signal or to minimize noise.
However I don’t think these are necessary for recording podcasts if you get your environment and recording settings right, especially when you’re starting out. Chances are that you make your signal worse than better if you don’t know exactly what you’re doing.
Recording Settings
After all the hardware lets talk about how you should set the recording up. In general, record each participant to a separate track on your recorder or in your software.
Gain / Levels
One of the most important things when recording is to set up the recording level / loudness correctly. Before you start recording, always do a soundcheck where you talk normally but also laugh out loud for example. Try to explore your natural dynamic range when you talk to people. Its quite common that people will talk rather calmly most of the time but when something funny comes up, they will laugh quite loud.
While you are doing this for yourself and the other participants, check the recording levels on your recorder or software on the computer.
What you want to avoid is that the signal “clips” at 0 dB. When a signal is louder than that, the sine wave will be clipped at 0 dB and that will result in very nasty sounding digital distortion. When it goes louder than 0 dB, usually this is signalled with a red LED or red warning indicator in your DAW (Digital Audio Workstation aka your audio editor).
The level ideally should be between -12 and -18 dB when talking normally. The louder voice or laughter should ideally stay below 0 dB.
It is not a problem if the signal is clipping for a split second in the loudest segments of the recording. Just make sure that 98% of the recording is in the -12 / -18 dB range.
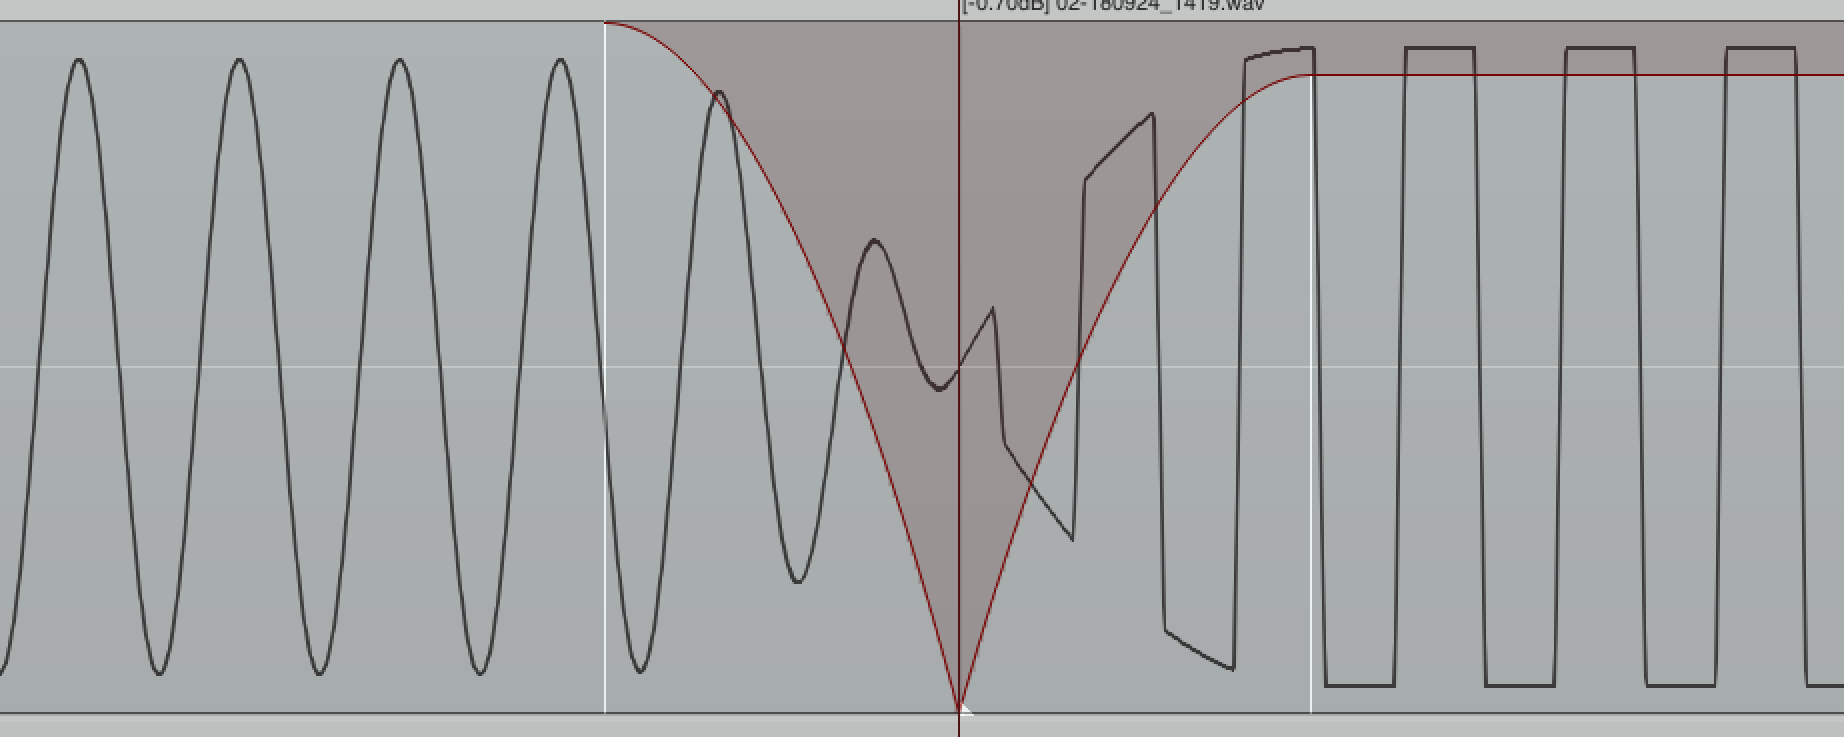
To demonstrate what happens if a signal is clipping, I have generated a 220hz sine wave, which I then amplified to +12dB. Left you see the perfect sine wave, right the amplified and clipped sine wave.
Both sine waves played after another sounds like this:
When looking at the two through a spectrum analyzer (in this case a graphical EQ), you can see the difference between the clean 220hz sine wave
and the clipped one which now has a lot of extra harmonics / distortion:
Record in 24Bit/48kHz
Next lets talk about the sample rate / frequency. Depending on your audio interface, the default it will be set to may either be 44.1 or 48kHz. 44.1kHz is the CD standard but since that is an obsolete medium I go with 48kHz which is also the standard for video productions. Quality wise it really doesn’t matter. Just make sure its not less than 44.1kHz. The human hearing range is roughly between 20Hz-20kHz and 44.1 will cover 22kHz just fine.
According to the Nyquist-Shannon sampling theorem, the sampling frequency for converting analog signals to digital, must be greater than twice the bandwidth of the input signal to reconstruct the original perfectly from the sampled version.
To give a visual analogy think about a digital photograph. The sample rate is the number of pixels in the picture. Once you have more pixels than the human eye can differentiate, it does not make a difference to the observer.
When you do post-processing on digital photos however, more pixels are desirable. The same is true in theory for audio, but its much less noticeable. Some audio effects will work internally with a higher sample rate for that reason.
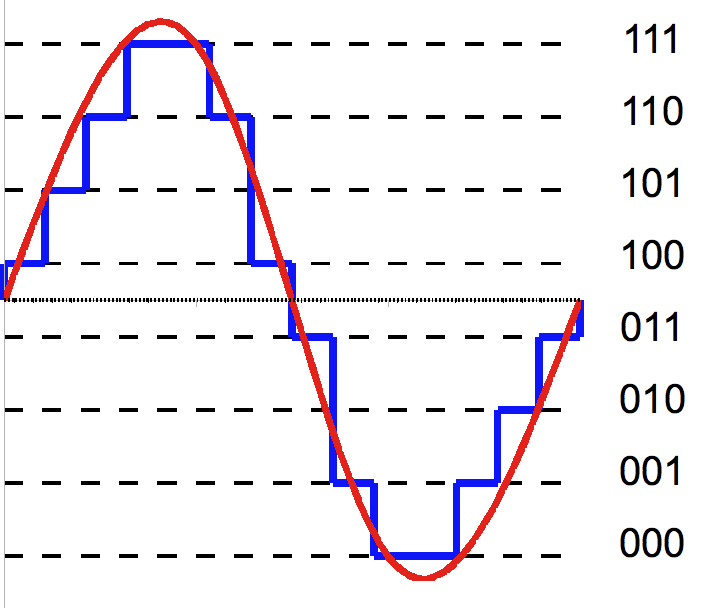
16 or 24Bit?
More important however is the bit depth. To illustrate its role lets take a look at the picture below. Its the same picture, first with 8bit of color per channel (RGB), then with 4bit, then with 2bit and lastly with 1bit per channel. So in the 1bit example, the color of a pixel can only be mixed with either 0% or 100% of red, green, and blue.
The higher the bit depth the more shades of a color are available. With 4bit, red, green and blue each can have 16 different shades which then will be mixed to get a more accurate color per pixel.
In audio, when a sample of a sine wave is converted to digital, a lower bit depth will provide fewer “shades” or steps to represent the analog signal. The process is called quantization and when analog signals are converted to discrete digital values, quantization noise is introduced as the smooth analog sine wave is now a stepped representation after rounding and truncating the value to fit one of the discrete numbers provided by the bit depth.
(This image is taken from the Wikipedia article about Quantization and is licensed under the BY-SA 3.0 license )
The reason why you want to record in 24bit rather than 16bit is that this quantization noise is much “quieter” than in 16bit. In other words the signal to noise ratio is much better with 24bit which means that it will provide a bigger dynamic range for your recording.
This noise is inaudible in 16Bit as well but once you start processing the digital audio, it can become audible much easier than with 24bit and the dynamic range is “only” 96dB vs. the 144dB for 24bit.
To make it even more obvious lets look at it from a different angle. In 24bit, the quietest signal can be -144dB, in 16bit it’s at -96dB, at 8bit it’s at -48dB which is quite audible.
To hide the quantization noise, it’s beneficial to actually have room to hide it. In 24bit you have all the room in the world, at -96dB 16bit is doing still good enough but at 8bit there is no room to hide the noise as the quietest signal can only be -48dB.
This is the same sound clip first in 16, then in 8bit:
I hope that illustrates the point. If you still want to know more then check out these videos:
The simple answer is no. If you record your podcast in 16Bit/44.1kHz it will work, especially if you have a great room, mic and pre-amp. Recording in 24bit however provides some benefits at very little (storage) cost. Especially when you have to do some post processing it can’t hurt to go with 24bits.
Just record at 24bit/48kHz and never worry about it again.
Post-Processing
After the recording, the tracks need to be mixed to be as pleasant, convenient and enjoyable for the listener as possible.
Post-Processing should be applied whenever it can improve the sound but ideally in a way that the listener doesn’t notice. A gate which you can hear muting and unmuting, or which is cutting off the endings of syllables can be quite annoying for the listener.
Lets go through the most common steps of post-processing.
Loudness / Levels
The first step should be to adjust the loudness of all the tracks to a common level. This can be done by playing the tracks back and looking at the level meters and adjust the faders/levels accordingly. Again it would be desirable to keep the target level of all tracks around -12dB on average to leave you some headroom for more processing.
Some people just normalize all the tracks but I don’t like that as it will put the loudest parts right at 0dB, leaving you no headroom afterwards.
Doing it manually should not take more than 2-3 minutes and it does not have to be perfect.
Noise
Once the levels are roughly adjusted, check all the tracks for noise. Especially when there is nobody speaking, check for 50Hz (or 60Hz in the US) hum or any other audible noise.
If you can hear 50 or 60Hz hum, it is quite easy to filter it out with a plugin in your DAW. The same is true for most static noises. I’m using Reaper most of the time and their plugin “ReaFir” is quite powerful at noise reduction.
A gate is a tool commonly used to reduce noise or crosstalk. When four people sit on the same table, recording a podcast, only one person will talk at the same time, while the others listen. However all microphones will pick up the voice of the speaker, much quieter than the mic of the speaker, but nonetheless, it will be audible.
To remove this crosstalk, you can put a gate on all the tracks. The gate will only let a signal on this track through if it reaches a certain loudness. Ideally only when the person in front of that microphone is speaking. When this microphone is picking up the voices of the other speakers at the table, the signal is much quieter and therefore the gate will close and mute the track.
The same would apply to background noise. Maybe you can hear a washing machine or ac rumble in the background. You could set the gate up so it mutes the track when only the quiet background noise is audible and un-mute the track whenever the signal is louder as in when you are saying something.
The problem I have with gating is, that if your background noise or general noise floor in the signal is quite audible, than it will be very noticeable when the gate opens and closes as the noise disappears and re-appears. Also it must be carefully set up so it does not mute the channel before the end of a word or syllable.
EQ
To some degree an Equalizer can be used for suppressing unwanted frequency ranges. Otherwise it can be used to compensate frequency “coloration” of live microphones or overall tonal balancing. Usually though for podcasts, EQs are not needed that frequently.
De-Essing
A de-esser is a compressor which only deals with sharp “es” sounds. If your microphones are very sensitive to high frequencies, chances are that you will end up with these unpleasant “es” sounds. So the de-esser is focused on these high frequencies and compresses them (makes them quieter) whenever they are occurring, leaving the rest of the signal as is.
Compression
A compressor is the primary tool to control dynamics in loudness. Lets say you did a soundcheck before recording and the person you are recording has a huge dynamic range between the normal conversation and a loud laughter. So you dialed back the gain on the pre-amp to prevent the signal from going over 0dB (clipping) but now the normal conversation level is too quiet.
The compressor would allow you to turn down the loudest parts so you can increase the level for the entire track without clipping and thereby making the quiet parts louder and the louder parts quieter.
The scope of this article is already quite big but to learn how to properly set up a compressor, please check out these videos:
Limiting
A limiter is a more extreme form of compression as it will simply not allow the signal to go over a certain limit. Even as you increase the level of your track, it will try to make it work within the limit by reducing the volume of the loudest parts. There are some other magic tricks involved but it’s amazing how loud you can get a signal with a good limiter, without noticing a degradation of the signal.
The limiter is a great tool for setting the target loudness of your mix and remove any short term peaks that you couldn’t control otherwise.
I’m always using a limiter at the end of mixing either podcasts or music and I’ll set it to -0.6dB so I’m sure the signal is not clipping and there is a bit of headroom for converting the audio to 16bit.
There are different scales and systems to measure loudness. Some are sample based – how loud is the signal at a given point in time, and some are perception based – how loud is a signal perceived by a human over a stretch of time. I’m sure there are more but again this is a subject that deserves an article on its own.
The important part is that there are loudness standards. They are these days based on the LUFS scale which stands for “Loudness Units Full Scale”. There are different standards on this scale for different applications. For podcasts and music, -14 LUFS seems to be the common standard these days.
Ideally your limiter will allow you to set your scale to -14 LUFS so you have an appropriate reference point when you set it up. Your normal db meters will only show you the momentary loudness, the LUFS meter will give you an integrated / overall loudness indication which relates to the human hearing.
I’m using the excellent FabFilter L2 limiter which also has a LUFS meter built in.
Mono vs Stereo
For me, podcasts do not make much sense in stereo unless you are aiming for a specific immersive atmosphere. Usually though this is more appropriate for audiobooks.
If your intro and outro jingles need to be stereo, you might as well do export the whole episode in stereo even though the conversations mix is mono.
I release all my podcasts in mono and many other people do as well. If you don’t care about the increased file size of stereo audio you can do whatever you feel like. Just remember: smaller files = faster downloads!
Exporting / Encoding
The last step of the process is the export to the final format. Be it mp3, mp4, ogg or opus. In general you need a lower bitrate for speech than for music. An mp3 at 112-128kbit is absolutely sufficient. An mp4 at 96kbit is perfectly fine as well. Ogg and Opus I haven’t used much myself but Opus is doing extremely well at low bitrates for spoken word.
Post-Processing As A Service
If all of that seems too complex to you and you just want to get your podcast recorded and published, there is at least one great service to do most of the post processing for you. It’s called Auphonic and it is absolutely fantastic for eliminating noise, removing crosstalk, adjusting levels, compression, limiting, meeting the target volume standards and exporting. It can be even linked to your podcast publishing platform and auto publish episodes if desired. I’ve been using it for years and couldn’t be happier with it.
But a word of warning is necessary. If your source material is crap, even Auphonic will not salvage it. The better the source material, the easier the job for auphonic (or you) will be and the better the result.
Bonus: Recording a Podcast with Remote Participants
Quite often people will record with guests on the show which are not at the same location. The failsafe option in this scenario is that each party will record their tracks locally and afterwards they get uploaded and mixed by the producer. This will yield the best quality and is safe from quality issues in the voice call.
There is also the option of using StudioLink, which is a free, podcast focussed, OPUS codec based VoIP solution. Due to the OPUS codec the audio quality is so good that often times I can take directly the StudioLink track for mixdown.
Bonus: The Ultimate Podcasting DAW
The german podcasting scene is quite active and one outcome was a mod of the DAW Reaper to become a podcast focussed DAW. It’s called Ultraschall (ultra-sonic) and I can highly recommend checking that out if you’re planning to do a lot of podcasting.
Bonus: Publishing Your Podcast
Lastly if you want to host your podcast yourself, one of the best ways is to do it with a wordpress plugin called Podlove, again a creation of the German podcast community which I have been using myself for the past couple of years as well.
Outro
I hope this was helpful to you. Leave questions, corrections and other ideas in the comment section and share it as you see fit
When I started skateboarding, I don’t know for sure but it was around the year 2000. For simplicity lets say it is more than 15 years ago by now.
When you start skateboarding there are a few essential things you need: A skateboard and a pair of shoes. The rest is pretty much optional.
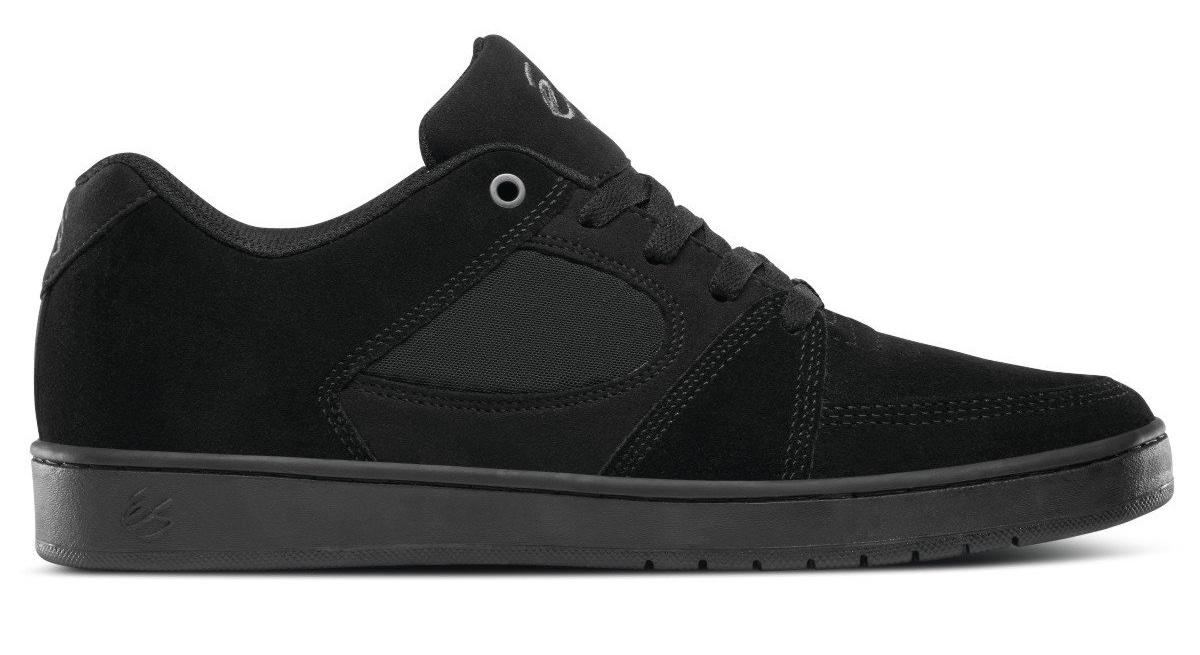
In the beginning I have tried a few different shoe brands but one company and one model of shoe stuck with me ever since I came across them: The és Accel.
I am wearing this shoe almost every single day since then. Although it is now the slim version which I prefer.
Now that I don’t do skateboarding anymore, a given pair will last me about 2-3 years, wearing them every single day. In summer, in winter, on festivals, at concerts, in rain, on beaches, or on a sail boat.
What is so special about this shoe?
The thing that got my attention at first was that it is one of the very few sneakers / skateboarding shoes which are available without the white sole. In fact my favorite model is the black with black sole one as you can see on the initial picture. I’d also say it is a timeless design and looks as good 15 years from now than it does today – especially in the slim variant.
Equally important to me is that the shoe is lasting for a long time and is comfortable to wear.
One of the common problems with other common shoes of this category is that the glued soles over time detach from the shoe which lets them deteriorate much faster after the first gap has been established.
The Accel is one of the few sneakers which feature a glued and stiched sole. So the sole detachment problem happens much later in the shoes lifetime. The sole itself lasts also very long as well before it breaks, gets thin or is lacking grip.
Almost every other seam on the shoe is double or triple stiched.
Those three things, aesthetics, comfort and unmatched durability, are the reasons why the Accel stands out to me.
A few years ago és announced that they would stop producing the Accel and I immediately searched on the internet for two more pairs in my size and favorite color. When I got them and walked around with the new pair, two different people aproached my on the street and asked me where I got them and that it was their favorite shoe as well.
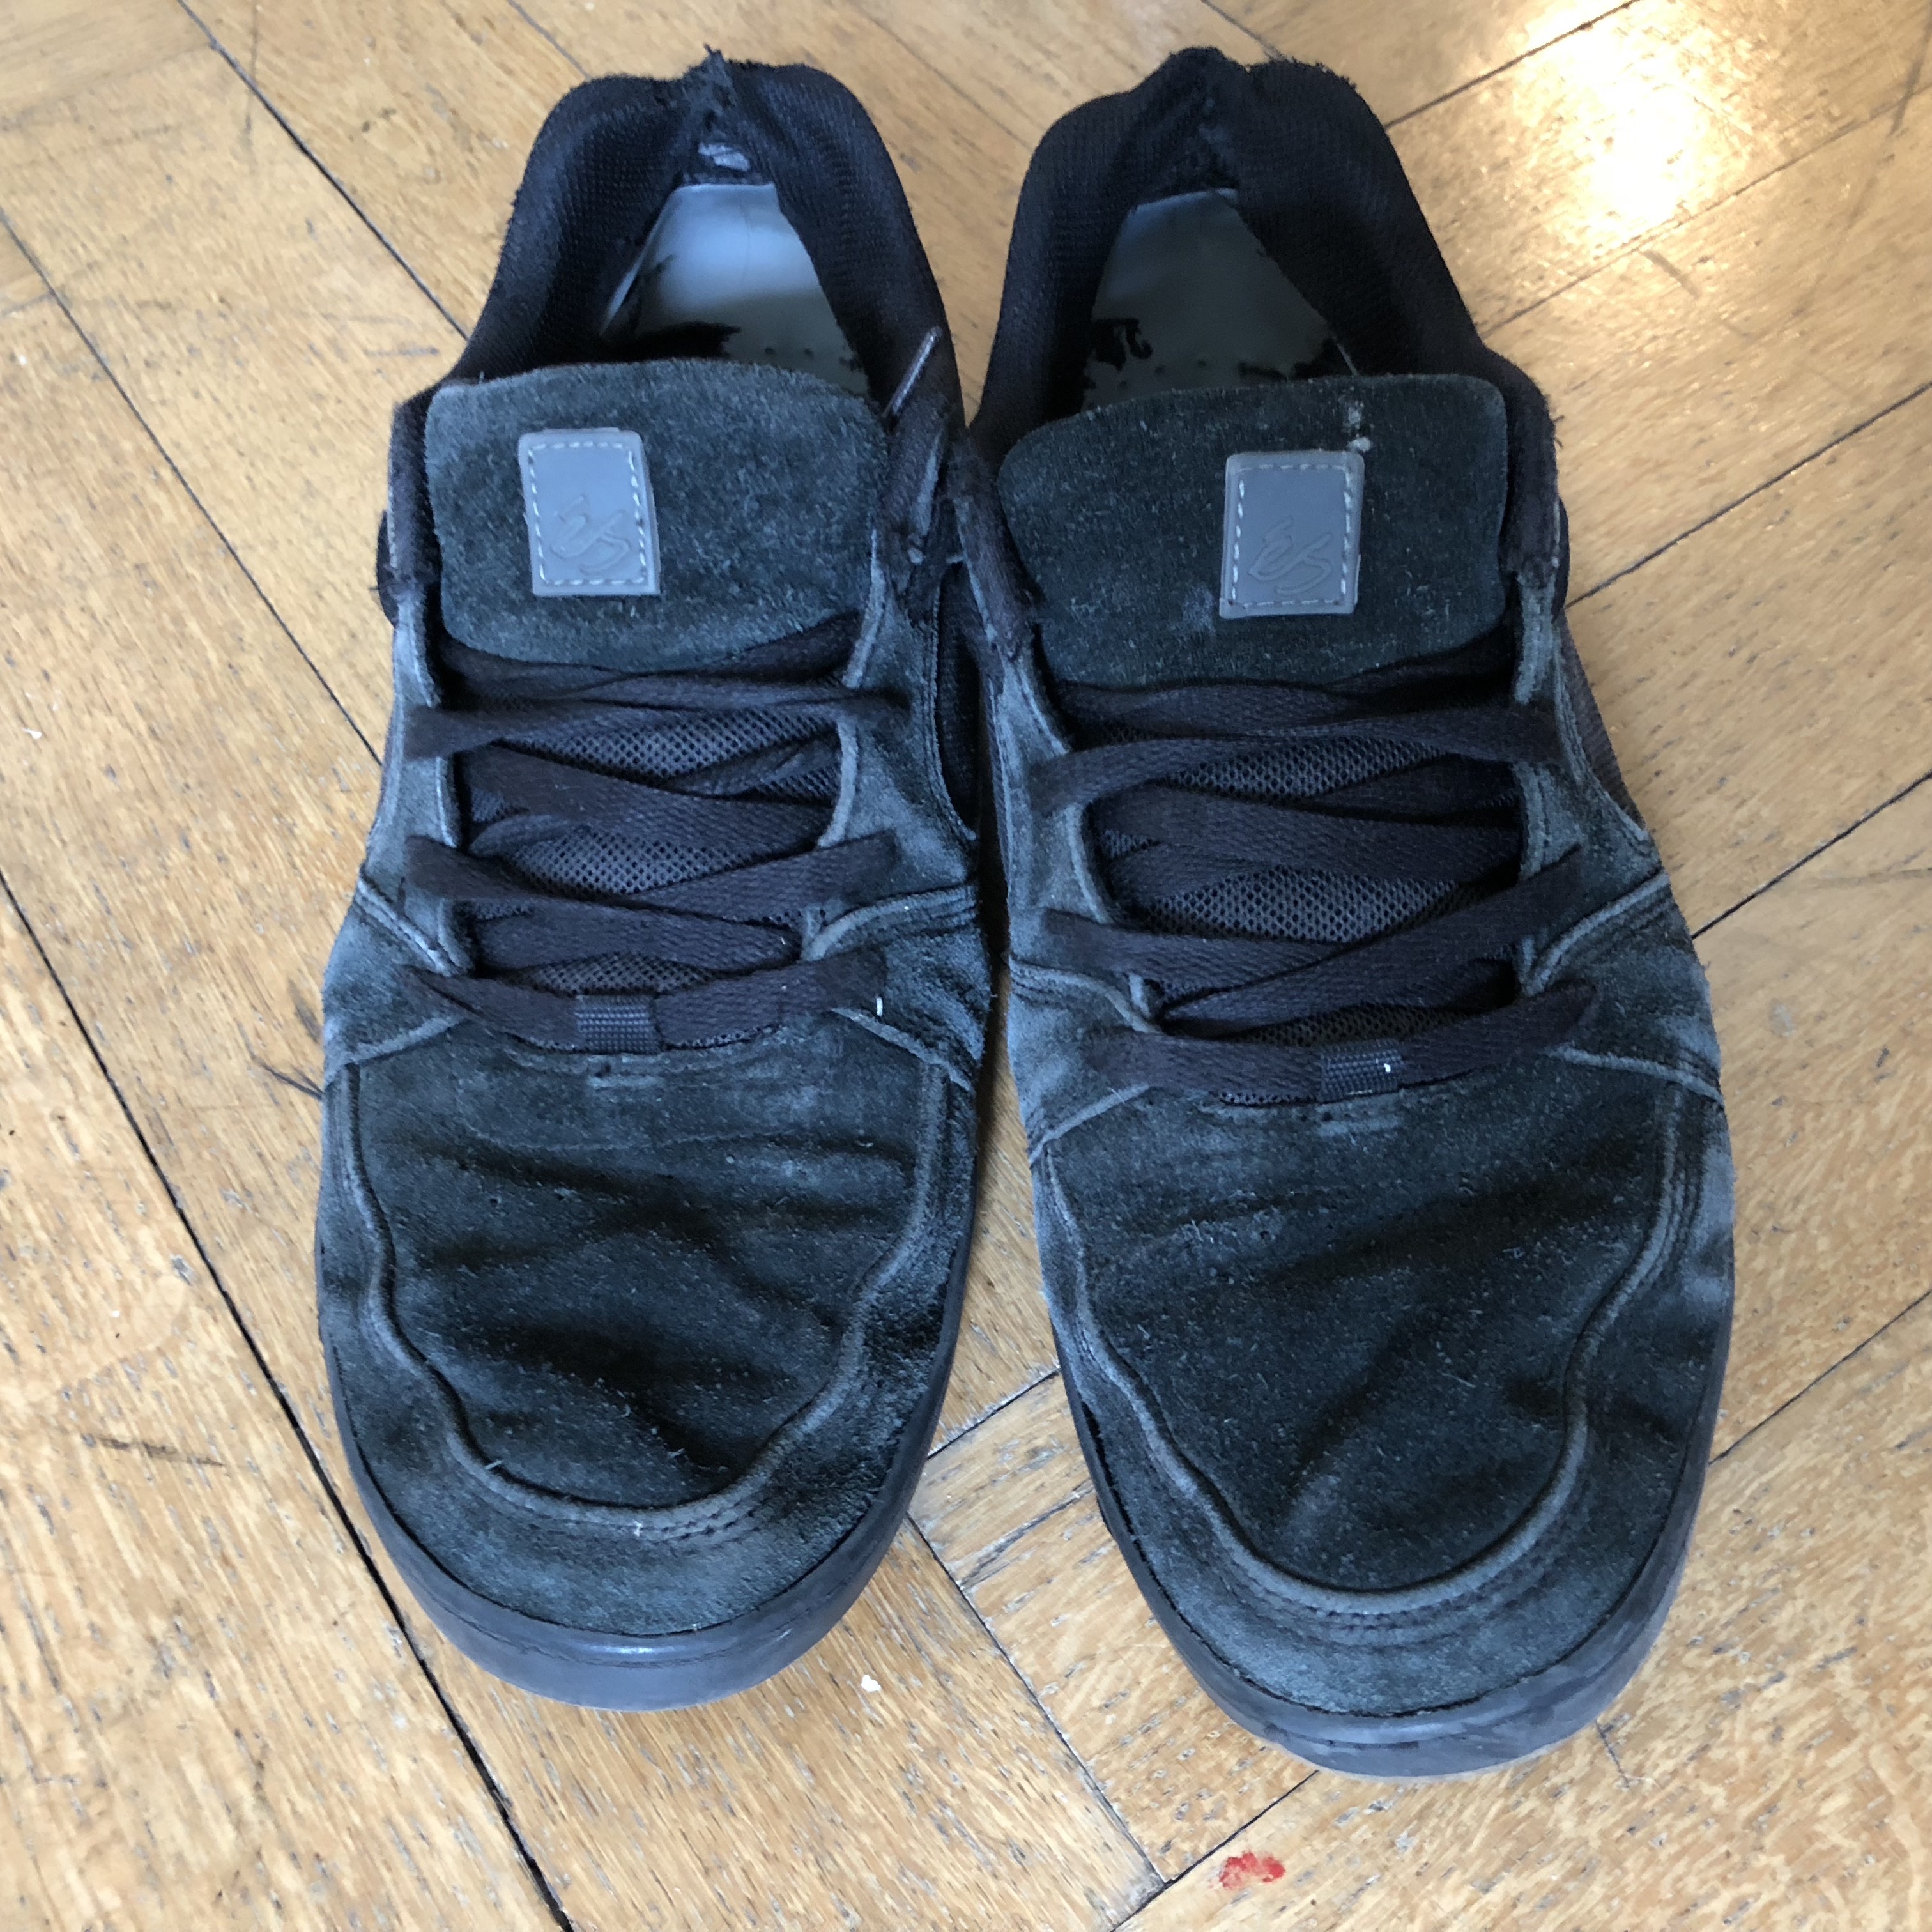
Luckily és came back after a while and so did the Accel with its slim variant. Two days ago my latest pair of Accels were finally telling me it was time to get a new pair. When I went to Onlineshop, I’ve checked my past orders to find out when I bought the last ones. Two years and 3 months.
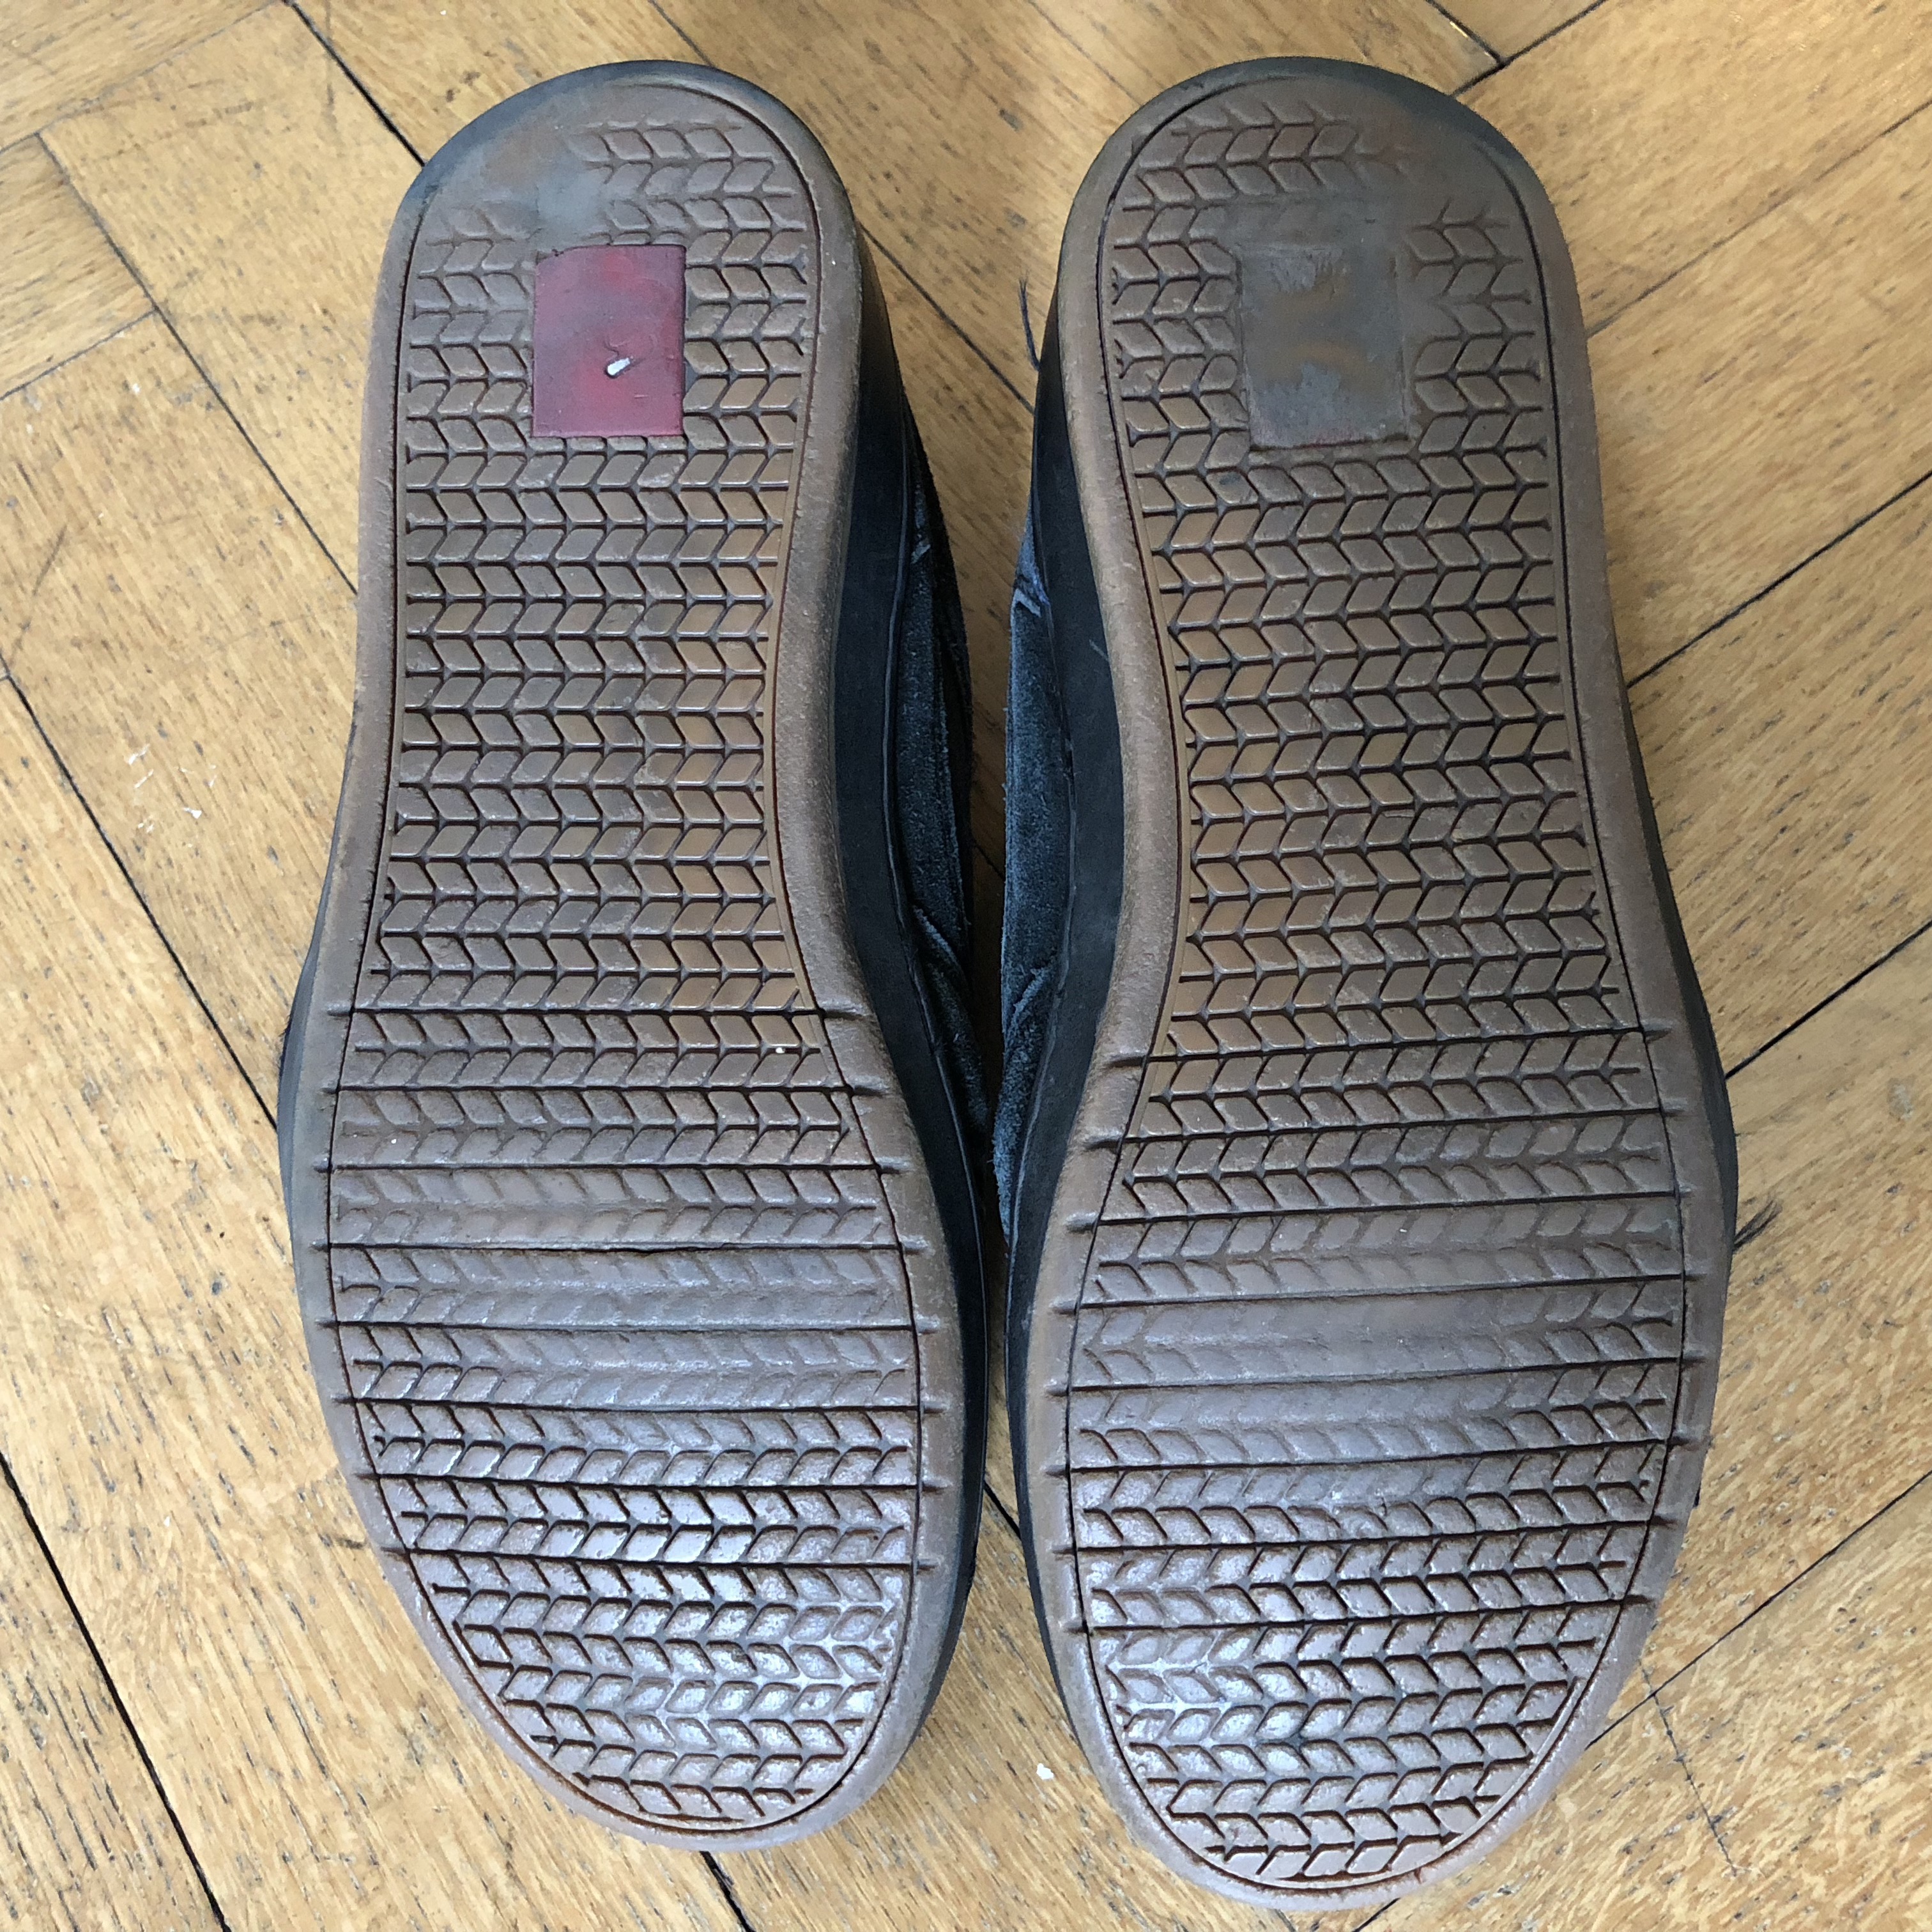
This is what they look like now:
The sole broke on one shoe and they barely have any grip left.
What could still be improved?
Even though I love this shoe, I still would like to see some improvements on the current generation:
On the original Accel the Sole on the front/cap was stitched two times. Currently its only one line. Especially this part of the shoe would benefit of getting the two lines of stitches back
The ends of the threads used to stich the sole on are sometimes a bit loose and if you don’t fix them right away, they will continue to undo the stitching which sucks.
The insole could be lasting a little bit longer. That might not be accurate but I have the feeling they used to last longer before. Now at about half time of the shoes lifetime, I replace the insole. Its not a huge problem but would make the shoe even better.
Final words
It is rare that I’m enthusiastic about a piece of clothing for 15 years. I must have had about 6 or 7 pairs since then. I hope this shoe will never go away and I hope és will try to improve it carefully even more when it comes to its durability and comfort.
It is not the cheapest sneaker but for something that lasts that long I happily pay a few extra bucks.
All the other cheaper and uglier sneakers / skate shoes I’ve tried over the years fell apart so much quicker and often wouldn’t even last one year before they would disintegrate.
I know – it is a bit silly to write this kind of homage to a skateboard sneaker but they carry me through the world for such a long time now, its almost emotional when I have to retire a pair.
This is a short post documenting a pizza recipe that I found through an elaborate process of experimenting at home and researching various sources.
Pictures will follow but for now:
Ingredients for one oven tray
400g of Flour (Italian Type 00 ideally)
1/2 cube (22g) of Yeast
Tea Spoon of Salt
Table Spoon of Olive Oil
Pinch of Sugar
180ml of water
Instructions
Put the flour in a big bowl. In a smaller bowl put the yeast with some lukewarm water, dissolve the yeast and add salt, oil and sugar.
Then add the yeast to the flour and use an electric kitchen mixer to slowly mix the dough. Add water as needed. The dough should be moist and smooth.
Once the dough is one big lump, put away the mixer and use your hands for the final kneading and form a nice ball of dough. Let it rest for 2-3 hours in a nice an warm spot. Sunny window works great.
After that, the dough should be roughly double the size. Now spread it out with your hands or a rolling pin. People claim that with a rolling pin, the dough is less fluffy but for me gentle rolling pin application works just fine and is faster.
Now add sauce (more on that later) and your other toppings.
Get your household oven to 230ºC and bake the pizza for 12-16 minutes. You will know when it looks ready. I’m using heat from the bottom for 2/3 of the time and the last 1/3 from above to properly melt any cheese that has not melted by then.